
Hire the author: Bijita K
Introduction
In this article, we will learn how to build a token validation decorator in Flask. We will use the decorator to take Okta access tokens, verify their validity, and extract user-related information from them. My motivation for creating this project was to find a method to authenticate users on my Flask APIs using Okta access tokens.
Prerequisites
This tutorial assumes that you are familiar with:
- Basic understanding of Flask
- Basic understanding of Docker
Here is the link to the GitHub repository of the project.
Glossary
Decorator: A decorator is a function that takes another function and extends the behavior of the latter function without explicitly modifying it.
Step-by-step Procedure
Step 1: Setting up the initial Flask project structure
We will begin by setting up the initial Flask project structure. I have created a starter branch in the tutorial’s GitHub repository for this purpose. Let’s start by cloning the branch using the command below:
git clone https://github.com/ldtalent/bijitak-how-to-build-token-introspection-decorator-in-flask-for-okta.gitAfter cloning the repository, create a file named .env to store the environment variables. Copy the contents from the env_template file to the .env file. For now, we will skip the Okta-related variables and comment them out. Add values to the other variables as shown below:
FLASK_APP=core/run.py
FLASK_CONFIG=development
Step 2: Setting up the Okta app integration
Now, we’ll set up our Okta app integration required for the token validation decorator. To do this, go to your Okta account and create a new app integration as follows:

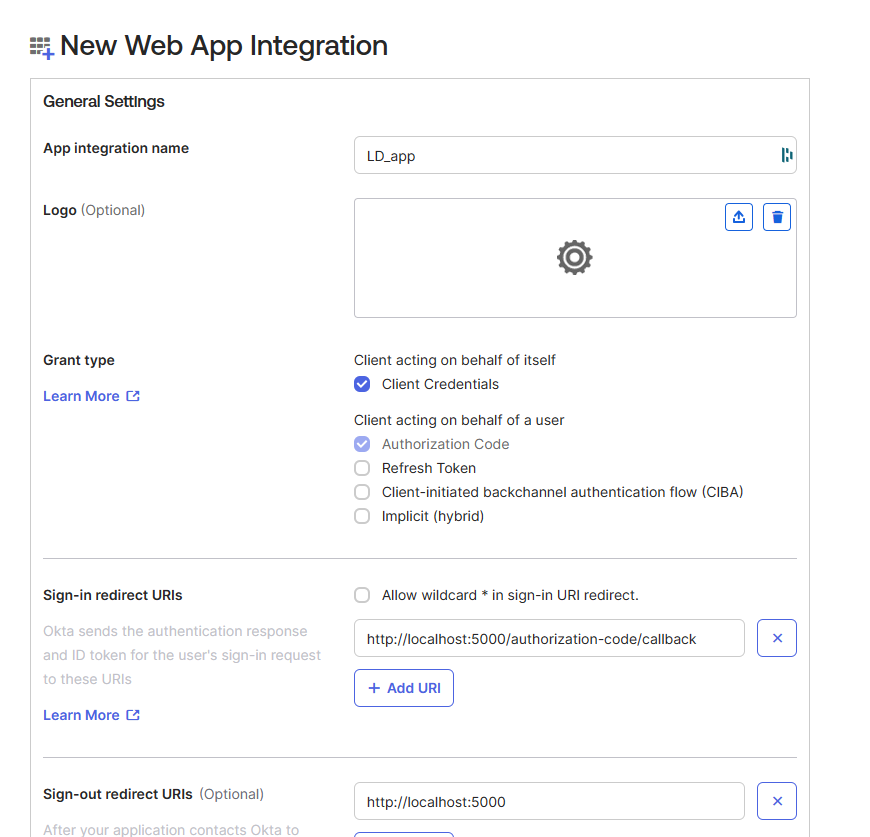
Here, I named it LD_app and added the required configurations. After this, you can click save to create the app integration. Now, let’s add the values for the Okta-related environment variables to our .env file, which we skipped in Step 1.
The value of the OKTA_CLIENT_ID variable can be found on the app integration page. Similarly, you can find the values for the rest of the variables by following the steps below:
- Go to the security tab and choose the API option.
- Under the authorization servers tab, select your authorization server.
- Then, under the settings tab, you will find the metadata URI link which will contain the values of the variables.
Step 3: Adding the token validation decorator
Once you have set up the Okta app integration, you can set up the decorator. For this, create a new file named decorators.py inside the core folder. Copy the content from below and add it to the decorators.py file:
This file contains hidden or bidirectional Unicode text that may be interpreted or compiled differently than what appears below. To review, open the file in an editor that reveals hidden Unicode characters.
Learn more about bidirectional Unicode characters
| import os | |
| import jwt | |
| import json | |
| import requests | |
| from core import cache | |
| from functools import wraps | |
| from flask import request, abort, g | |
| def login_required(func): | |
| """ | |
| Decorator to check the validity of the Okta JWT | |
| JWT are also decoded to get user data which is set in g object | |
| """ | |
| @wraps(func) | |
| def wrap(*args, **kwargs): | |
| JWT_ISSUER = os.environ.get('OKTA_ISSUER') | |
| CLIENT_ID = os.environ.get('OKTA_CLIENT_ID') | |
| authorization = request.headers.get("authorization", None) | |
| if not authorization: | |
| abort(403) | |
| try: | |
| token = authorization.split(' ')[1] | |
| key_id = jwt.get_unverified_header(token)['kid'] | |
| jwk = get_jwk(key_id, cache=cache) | |
| token_data = jwt.decode( | |
| token, jwk, verify=True, issuer=JWT_ISSUER, | |
| audience=os.environ.get('OKTA_AUDIENCE'), algorithms=['RS256'] | |
| ) | |
| except Exception as e: | |
| print(e, "exception occured.", flush=True) | |
| abort(403) | |
| if token_data['cid'] == CLIENT_ID: | |
| g.user = token_data['sub'] | |
| g.user_id = token_data['uid'] | |
| else: | |
| abort(401) | |
| return func(*args, **kwargs) | |
| return wrap | |
| def get_jwk(kid, cache=None): | |
| """ | |
| Gets JWK with key id | |
| """ | |
| # if cache exists then load from cache | |
| key = None | |
| if cache: | |
| key = cache.get(kid) | |
| if key is None: | |
| keys = get_jwks() | |
| for k in keys: | |
| if cache: | |
| cache.set(k['kid'], k) | |
| if k['kid'] == kid: | |
| key = k | |
| if key: | |
| return jwt.algorithms.RSAAlgorithm.from_jwk(json.dumps(key)) | |
| raise Exception | |
| def get_jwks(): | |
| """ | |
| Get JWKs from OpenID Provider | |
| """ | |
| jwks_uri = os.environ.get('OKTA_JWKS_URI') | |
| jwks = requests.get(jwks_uri) | |
| return jwks.json().get('keys') |
Now, let’s discuss what the above code does and how it works step by step:
- Initially, the login decorator takes in the request and extracts the auth token from the header.
- It uses the auth token to get the key id. The key id is a unique identifier for the key used to sign the token. It will further be used to retrieve the public key from a JSON web key (JWK) set.
- Then, the
get_jwkfunction is called. - The
get_jwkfunction receives the key id from the decorator function and searches the cache to see if anything is present regarding the key id. If present, it uses that to find the related JSON web key. - If not, it proceeds to call the
get_jwksfunction. This function usesissuer,client_id, andjwks_urito get the JSON web key set and return it back to theget_jwkfunction. - The
get_jwkfunction uses the received JSON web key set to find the related JSON web key and also stores it in the cache. - Subsequently, the key is returned to the login decorator function, which is finally used to decode the token.
- Once decoded, we can now extract information as needed from the token. In the code, the value of
subfrom the token data is extracted and stored as a global variableuser. - The final step is to compare the client id
cidextracted from the token data to the client id of your Okta application. This is done to ensure that the Flask app is giving access only to the correct users.
Step 4: Implementing the decorator
To implement the login_required token validation decorator we will update our auth_app/routes.py app to add it to our existing endpoint. You can copy the updated code as shown below:
This file contains hidden or bidirectional Unicode text that may be interpreted or compiled differently than what appears below. To review, open the file in an editor that reveals hidden Unicode characters.
Learn more about bidirectional Unicode characters
| from flask import g | |
| from core.auth_app import bp | |
| from core.decorators import login_required | |
| @bp.route('/test', methods=['GET']) | |
| @login_required | |
| def test(): | |
| context = { | |
| "user_id": g.user_id, | |
| "email": g.user | |
| } | |
| return context, 200 |
The decorator will check the token sent in the request to the endpoint. If the token is valid, the endpoint will return the user’s id and email extracted from the token data.
Step 5: Running the project
Finally, we can run our project. We will use Docker to run the project. Use the commands below to build the docker image using our docker-compose file and run the container.
docker compose build
docker compose up -d
Here, you may come across an issue where the compose command may not be recognized. In this case, you will need to replace docker compose with docker-compose. This depends on which version you have installed in your system.
Now, the project will be ready and running.
Learning Tools
To understand this tutorial, you must understand the basics of Flask. Therefore, I recommend starting with the official documentation of Flask if needed. Along with that, you can also use the Okta documentation to learn more about the app integration process. Similarly, understanding how to work with docker will help make the app setup and running process much smoother and more efficient. For this, you can use the official docker documentation. Moreover, you can also choose to learn from the many videos and blogs available online.
Learning Strategy
While creating the token validation decorator for this project, StackOverflow was quite helpful. You can also use the site JSON Web Tokens – jwt.io to decode the Okta tokens to see what parts the token consists of. It can help to clarify what exactly we are decoding and how a JWT token can store the information.
Reflective Analysis
Working on this project to create a token validation decorator has been quite beneficial for me to understand the process of how a JWT token works and is decoded. There exist some packages that can be used for the same purpose, but the above tutorial makes the steps that are taking place quite clear. The process of decoding any other JWT token is similar. Therefore, it has been helpful not just for creating an Okta token validation decorator but for others as well.
Conclusion
In conclusion, I hope the above tutorial will be helpful to anyone attempting to create a similar project or just to understand the process of how the token validation decorator works. Additionally, this project can also be applied to decode other tokens like Auth0 by making a few customizations on the information extraction step. You can check out the GitHub repository of this project.
If you want to learn more about Docker you can check out this article on how to dockerize a NodeJS application.
Hire the author: Bijita K
Highly committed and reliable software developer with good experience in backend development.
Wow that was helpful! I needed this.
I’m glad this helped!
Great Blog, The creator can take things a step further by adding a cool feature (i.e Automating the process of deploying the project image to Docker Hub). This makes it super simple for others to use and include in their real-world applications.
Thank you for the feedback!