
Hire the author: Mcdavid E

Image Source: https://webassets.mongodb.com/_com_assets/cms/mongodbkafka-hblts5yy33.png
Introduction
On a project I recently worked on, I had to sync data between two databases, one in a physical location and the other in the cloud. While looking for solutions, I had to take into consideration internet outage. How do I ensure my data is replicated when the internet comes back up, without losing data?. That’s when I came across Kafka.
Kafka is used for building real-time data pipelines and streaming apps. It is horizontally scalable, fault-tolerant, wicked fast, and runs in production in thousands of companies.
In this tutorial, I’ll be demonstrating how to create a pipeline to sync data between two MongoDB clusters. We will be creating a local replica set and syncing it online an online cluster. We will also touch a bit on Kafka’s topics and the concept of MongoDB Kafka connector. You can find the code and config files on Github to follow through.
Glossary
- Kafka – Kafka is a distributed streaming platform which can be used to publish and subscribe to streams of records. It can also store streams of data and process them in real-time.
- MongoDB – MongoDB is a general-purpose, document-based, distributed database built for modern application developers and for the cloud era.
- Change Streams – Change streams allow applications to access real-time data changes in MongoDB without the complexity and risk of tailing the oplog. Applications can use change streams to subscribe to all data changes on a single collection, a database, or an entire deployment, and immediately react to them.
Prerequisites
I’ll be using the NodeJS driver for MongoDB in this project so you’ll need knowledge of the following to properly follow up.
- NodeJS
- MongoDB
Setting up MongoDB
For us to share data properly between our database we’ll be creating our MongoDB database as a cluster. You can do this either by creating a sharded cluster or replica set. This is important because Kafka uses MongoDB’s change stream feature to listens for change events from MongoDB, and change streams only work with either a replica set or sharded clusters. You can read more on change streams here . For this tutorial, I created a database cluster using a replica set.
MongoDB Atlas Setup
To quickly set up a MongoDB cluster go to https://cloud.mongodb.com and create two free clusters. Make sure you sign up if you do not already have an existing MongoDB atlas. Then follow the steps below to create a cluster.
Step 1

First, you’ll need to create a project in which you will house your clusters. After creating your project, go ahead and create a new cluster in the next screen as shown below. Remember to give your new cluster a descriptive name.
Step 2

MongoDB Atlas comes with a variety of plans including a free plan which we can use to test in this tutorial. If you feel you need higher specifications you can go for a higher plan. The next image shows you how to select a plan.

Step 3
It takes about a minute or two for the cluster to be up and running when it’s ready you can go ahead to configure your connection settings. As shown in the following image, click on connect to configure your connection settings to your database.

The modal that pops up after we click on connect gives us the opportunity to set access control and user credentials for our new cluster.

For the purpose of this tutorial set your IP address to accept inbound connections from all IPs by setting it to 0.0.0.0/0. Secondly, create a user for your cluster with its password which you’ll use in connecting to your instance. After creating the user and setting the IP address, go ahead and click on choose a connection string.
Step 4

Click on Connect your application to view your connection string. Then, copy the connection string and keep for later. Replace the <dbUsername> and <dbPassword> with the name and username you created respectively.
Follow the above steps to create the second cluster and also save its connection string which we will use while connecting with Kafka.
Download and Setup Kafka
After setting up our MongoDB clusters, let’s install Kafka on our server to handle communication between the two clusters. To do this we need to first download Kafka from the official website. Then click here to download Kafka. Download the 2.5.0 release and un-tar it in your terminal with the following command on Unix systems. Then navigate to the Kafka directory.
> tar -xzf kafka_2.12-2.5.0.tgz
> cd kafka_2.12-2.5.0Note: Kafka requires Java JDK installed on your machine for it to work.
Configure Kafka and Zookeeper
ZooKeeper is a centralized service for maintaining configuration information, naming, providing distributed synchronization. It also helps in providing group services. Kafka uses Zookeeper to manage config data.
Inside the Kafka directory, we find three directories, bin, config, and lib. The bin directory contains all the scripts needed to run Kafka. The config directory contains all the necessary config files, while the lib directory contains .jar packages.
First, create a data directory inside the Kafka root directory to house both Kafka and Zookeeper data. Then reference the newly created folder in your Kafka and Zookeeper config files. Let’s configure Kafka and Zookeeper to use the data directory. Navigate to the config directory and open the server.properties file with your favorite command line text editor or gedit. Look for the Log Basics section and edit the log.dirs line and add the path to your Kafka data directory.
############################# Log Basics #############################

# A comma separated list of directories under which to store log files.
log.dirs=/home/mcdavid/kafka_2.12-2.4.1/data/kafka
# The default number of log partitions per topic. More partitions allow greater
Also, do the same for the Zookeeper config file zookeeper.properties, find and edit the dataDir line with the path to your zookeeper config directory as shown below.
# the directory where the snapshot is stored.
dataDir=/home/mcdavid/kafka_2.12-2.4.1/data/zookeeper
# the port at which the clients will connect
To run Kafka you need to start Zookeeper first, to do this we run the following command on our terminal from inside your Kafka installation root directory `bin/zookeeper-server-start.sh <path-to-zookeeper-config-file` as shown below.
 ~/kafka_2.12-2.4.1> bin/zookeeper-server-start.sh ~/kafka_2.12-2.4.1/config/zookeeper.properties


2020-05-23 10:21:18,359] INFO Reading configuration from: /home/mcdavid/kafka_2.12-2.4.1/config/zookeeper.properties (org.apache.zookeeper.server.quorum.QuorumPeerConfig)
[2020-05-23 10:21:18,410] INFO clientPortAddress is 0.0.0.0:2181 (org.apache.zookeeper.server.quorum.QuorumPeerConfig)
[2020-05-23 10:21:18,411] INFO secureClientPort is not set (org.apache.zookeeper.server.quorum.QuorumPeerConfig)
..........
Then, start the Kafka server with the command bin/kafka-server-start.sh <path-to-kafka-config-file> as shown below.
~/kafka_2.12-2.4.1> bin/kafka-server-start.sh ~/kafka_2.12-2.4.1/config/server.properties
[2020-05-23 11:31:32,588] INFO Registered kafka:type=kafka.Log4jController MBean (kafka.utils.Log4jControllerRegistration$)
[2020-05-23 11:31:34,674] INFO Registered signal handlers for TERM, INT, HUP (org.apache.kafka.common.utils.LoggingSignalHandler)
[2020-05-23 11:31:34,677] INFO starting (kafka.server.KafkaServer)
[2020-05-23 11:31:34,680] INFO Connecting to zookeeper on localhost:2181 (kafka.server.KafkaServer)
[2020-05-23 11:31:34,796] INFO [ZooKeeperClient Kafka server] Initializing a new session to localhost:2181. (kafka.zookeeper.ZooKeeperClient)To shut down Kafka you need to end the Kafka process first before zookeeper so you don’t lose data. Next, let’s touch briefly on MongoDB change streams.
MongoDB Change Streams
MongoDB’s Kafka connector uses change streams to listen for changes on a MongoDB cluster, database, or collection.
According to the MongoDB change streams docs, change streams allow applications to access real-time data changes without the complexity and risk of tailing the oplog. Applications can use change streams to subscribe to all data changes on a single collection, a database, or an entire deployment, and immediately react to them. One thing to take note of is that change streams work only with either replica sets or sharded clusters
Connect to MongoDB Database
Let’s demonstrate how change streams work with a little example. We will be using the NodeJS driver for MongoDB mongodb.
First, create a new directory mongodb-kafka-example and cd into it. Then run npm init -y as shown below.
> mkdir mongodb-kafka-example
> cd mongodb-kafka-example
/mongodb-kafka-example> npm init -y
Next, we’ll install our mongodb package from NPM.
> npm install -S mongodbAfter the installation is complete, create a new file called changeStreamData.js and paste the following code in it.
| /** | |
| * This script can be used to create, update, and delete sample data. | |
| * This script is especially helpful when testing change streams. | |
| */ | |
| const { MongoClient } = require('mongodb'); | |
| async function main() { | |
| /** | |
| * Connection URI. Update <username>, <password>, and <your-cluster-url> to reflect your cluster. | |
| * See http://bit.ly/NodeDocs_lauren for more details | |
| */ | |
| const uri = "mongodb+srv://dbUser:dbUserPassword@cluster0-jj6uu.mongodb.net/test?retryWrites=true&w=majority"; | |
| /** | |
| * The Mongo Client you will use to interact with your database | |
| * See bit.ly/Node_MongoClient for more details | |
| */ | |
| const client = new MongoClient(uri); | |
| try { | |
| // Connect to the MongoDB cluster | |
| await client.connect(); | |
| // Make the appropriate DB calls | |
| const operaHouseViews = await createListing(client, { | |
| name: "Opera House Views", | |
| summary: "Beautiful apartment with views of the iconic Sydney Opera House", | |
| property_type: "Apartment", | |
| bedrooms: 1, | |
| bathrooms: 1, | |
| beds: 1, | |
| address: { | |
| market: "Sydney", | |
| country: "Australia" | |
| } | |
| }); | |
| const privateRoomInLondon = await createListing(client, { | |
| name: "Private room in London", | |
| property_type: "Apartment", | |
| bedrooms: 1, | |
| bathroom: 1 | |
| }); | |
| const beautifulBeachHouse = await createListing(client, { | |
| name: "Beautiful Beach House", | |
| summary: "Enjoy relaxed beach living in this house with a private beach", | |
| bedrooms: 4, | |
| bathrooms: 2.5, | |
| beds: 7, | |
| last_review: new Date() | |
| }); | |
| await updateListing(client, operaHouseViews, { beds: 2 }); | |
| await updateListing(client, beautifulBeachHouse, { | |
| address: { | |
| market: "Sydney", | |
| country: "Australia" | |
| } | |
| }); | |
| const italianVilla = await createListing(client, { | |
| name: "Italian Villa", | |
| property_type: "Entire home/apt", | |
| bedrooms: 6, | |
| bathrooms: 4, | |
| address: { | |
| market: "Cinque Terre", | |
| country: "Italy" | |
| } | |
| }); | |
| const sydneyHarbourHome = await createListing(client, { | |
| name: "Sydney Harbour Home", | |
| bedrooms: 4, | |
| bathrooms: 2.5, | |
| address: { | |
| market: "Sydney", | |
| country: "Australia" | |
| } | |
| }); | |
| await deleteListing(client, sydneyHarbourHome); | |
| } finally { | |
| // Close the connection to the MongoDB cluster | |
| await client.close(); | |
| } | |
| } | |
| main().catch(console.error); | |
| /** | |
| * Create a new Airbnb listing | |
| * @param {MongoClient} client A MongoClient that is connected to a cluster with the sample_airbnb database | |
| * @param {Object} newListing The new listing to be added | |
| * @returns {String} The id of the new listing | |
| */ | |
| async function createListing(client, newListing) { | |
| // See http://bit.ly/Node_InsertOne for the insertOne() docs | |
| const result = await client.db("sample_airbnb").collection("listingsAndReviews").insertOne(newListing); | |
| console.log(`New listing created with the following id: ${result.insertedId}`); | |
| return result.insertedId; | |
| } | |
| /** | |
| * Update an Airbnb listing | |
| * @param {MongoClient} client A MongoClient that is connected to a cluster with the sample_airbnb database | |
| * @param {String} listingId The id of the listing you want to update | |
| * @param {object} updatedListing An object containing all of the properties to be updated for the given listing | |
| */ | |
| async function updateListing(client, listingId, updatedListing) { | |
| // See http://bit.ly/Node_updateOne for the updateOne() docs | |
| const result = await client.db("sample_airbnb").collection("listingsAndReviews").updateOne({ _id: listingId }, { $set: updatedListing }); | |
| console.log(`${result.matchedCount} document(s) matched the query criteria.`); | |
| console.log(`${result.modifiedCount} document(s) was/were updated.`); | |
| } | |
| /** | |
| * Delete an Airbnb listing | |
| * @param {MongoClient} client A MongoClient that is connected to a cluster with the sample_airbnb database | |
| * @param {String} listingId The id of the listing you want to delete | |
| */ | |
| async function deleteListing(client, listingId) { | |
| // See http://bit.ly/Node_deleteOne for the deleteOne() docs | |
| const result = await client.db("sample_airbnb").collection("listingsAndReviews").deleteOne({ _id: listingId }); | |
| console.log(`${result.deletedCount} document(s) was/were deleted.`); | |
| } |
Then, replace the value uri on the line below with the connection string from the first cluster you created.
const uri = "mongodb+srv://dbUser:dbUserPassword@cluster0-jj6uu.mongodb.net/test?retryWrites=true&w=majority";The code above creates a database called sample_airbnb and a collection called listingsAndReviews and creates, updates, and deletes documents from it. We will use change streams to read changes from the database collection in realtime. To do this create another file called index.js and paste the following code in it.
| const {MongoClient} = require('mongodb'); | |
| async function listDatabases(client){ | |
| databasesList = await client.db().admin().listDatabases(); | |
| console.log("Databases:"); | |
| databasesList.databases.forEach(db => console.log(` - ${db.name}`)); | |
| }; | |
| function closeChangeStream(timeInMs = 60000, changeStream) { | |
| return new Promise((resolve) => { | |
| setTimeout(() => { | |
| console.log("Closing the change stream"); | |
| changeStream.close(); | |
| resolve(); | |
| }, timeInMs) | |
| }) | |
| }; | |
| async function monitorListingsUsingEventEmitter(client, timeInMs = 60000, pipeline = []) { | |
| const collection = client.db("sample_airbnb").collection("listingsAndReviews"); | |
| const changeStream = collection.watch(pipeline); | |
| changeStream.on('change', (next) => { | |
| console.log(next); | |
| }); | |
| await closeChangeStream(timeInMs, changeStream); | |
| } | |
| async function main(){ | |
| /** | |
| * Connection URI. Update <username>, <password>, and <your-cluster-url> to reflect your cluster. | |
| * See https://docs.mongodb.com/ecosystem/drivers/node/ for more details | |
| */ | |
| const uri = 'mongodb+srv://dbUser:dbUserPassword@cluster0-jj6uu.mongodb.net/test?retryWrites=true&w=majority'; | |
| const client = new MongoClient(uri); | |
| try { | |
| // Connect to the MongoDB cluster | |
| await client.connect(); | |
| const pipeline = [ | |
| { | |
| '$match': { | |
| 'operationType': 'delete', | |
| // 'fullDocument.address.country': 'Australia', | |
| // 'fullDocument.address.market': 'Sydney' | |
| }, | |
| } | |
| ]; | |
| // Make the appropriate DB calls | |
| await listDatabases(client); | |
| await monitorListingsUsingEventEmitter(client, 30000, pipeline); | |
| } catch (e) { | |
| console.error(e); | |
| } finally { | |
| await client.close(); | |
| } | |
| } | |
| main().catch(console.error); |
Just as in our first file change the uri to the connection string the first cluster you created.
The first function listDatabases take in the client which is the instance of our MongoDB cluster as an argument and list all the databases attached to it.
Then, the next function closeChangeStream, closes our changeStream process after 60 seconds.
Then there is a monitorListingsUsingEventEmitter function, which uses the watch method to listen for events emitted by change streams. To determine what operation types to listen for, change stream supports MongoDB aggregations. Therefore, the monitorListingsUsingEventEmitter function takes in a pipeline which is passed as an argument to our watch method. It also calls the closeChangeStream function created earlier to disconnect from the stream.
Lastly, we have our main function which puts all the initial functions together. This is where we declare our connection string and connect to our cluster. The pipeline is also declared in this file and it’s set to listen for insert operation types, you change this to either delete or update, operation types
Testing the MongoDB connection
To test this out open your terminal and navigate to the project directory. Start the index app by running node index.js. This should log something like this on your terminal.
 ~/Desktop/Projects/mongoDb-test-project>  node index.js

(node:108891) DeprecationWarning: current Server Discovery and Monitoring engine is deprecated, and will be removed in a future version. To use the new Server Discover and Monitoring engine, pass option { useUnifiedTopology: true } to the MongoClient constructor.
Databases:
 - sample_airbnb
 - admin
 - local
One thing to remember, is that this terminates after 60 seconds. Open another terminal instance and run, node changeStreamData.js to send data to our database cluster on atlas. This will also generates logs on the terminal like this.
 ~/Desktop/Projects/mongoDb-test-project> node changeStreamTestData.js

(node:108906) DeprecationWarning: current Server Discovery and Monitoring engine is deprecated, and will be removed in a future version. To use the new Server Discover and Monitoring engine, pass option { useUnifiedTopology: true } to the MongoClient constructor.
New listing created with the following id: 5ec969ccdc25eca96b1f709c
New listing created with the following id: 5ec969ccdc25eca96b1f709d
New listing created with the following id: 5ec969ccdc25eca96b1f709e
1 document(s) matched the query criteria.
1 document(s) was/were updated.
1 document(s) matched the query criteria.
1 document(s) was/were updated.
New listing created with the following id: 5ec969cddc25eca96b1f709f
New listing created with the following id: 5ec969cddc25eca96b1f70a0
1 document(s) was/were deleted.
Look at the terminal where we ran our index.js to watch for data changes with insert operation type. The change stream data for all insert operation type has been logged to the terminal.
Also, check your collection on your Atlas MongoDB cluster you should see the added data in the listingsAndReviews collection.
Kafka Connectors
We have been able to set up our first MongoDB cluster and also send data to it, the next step should be to connect it to reflect the same data on our second cluster with Kafka. Before that let’s talk a bit about Kafka connectors.
Kafka Connect is a framework for connecting Apache Kafka® with external systems such as databases, key-value stores, search indexes, and file systems. You can use existing connector implementations for common data sources and sinks to move data into and out of Kafka, or write your own connectors.
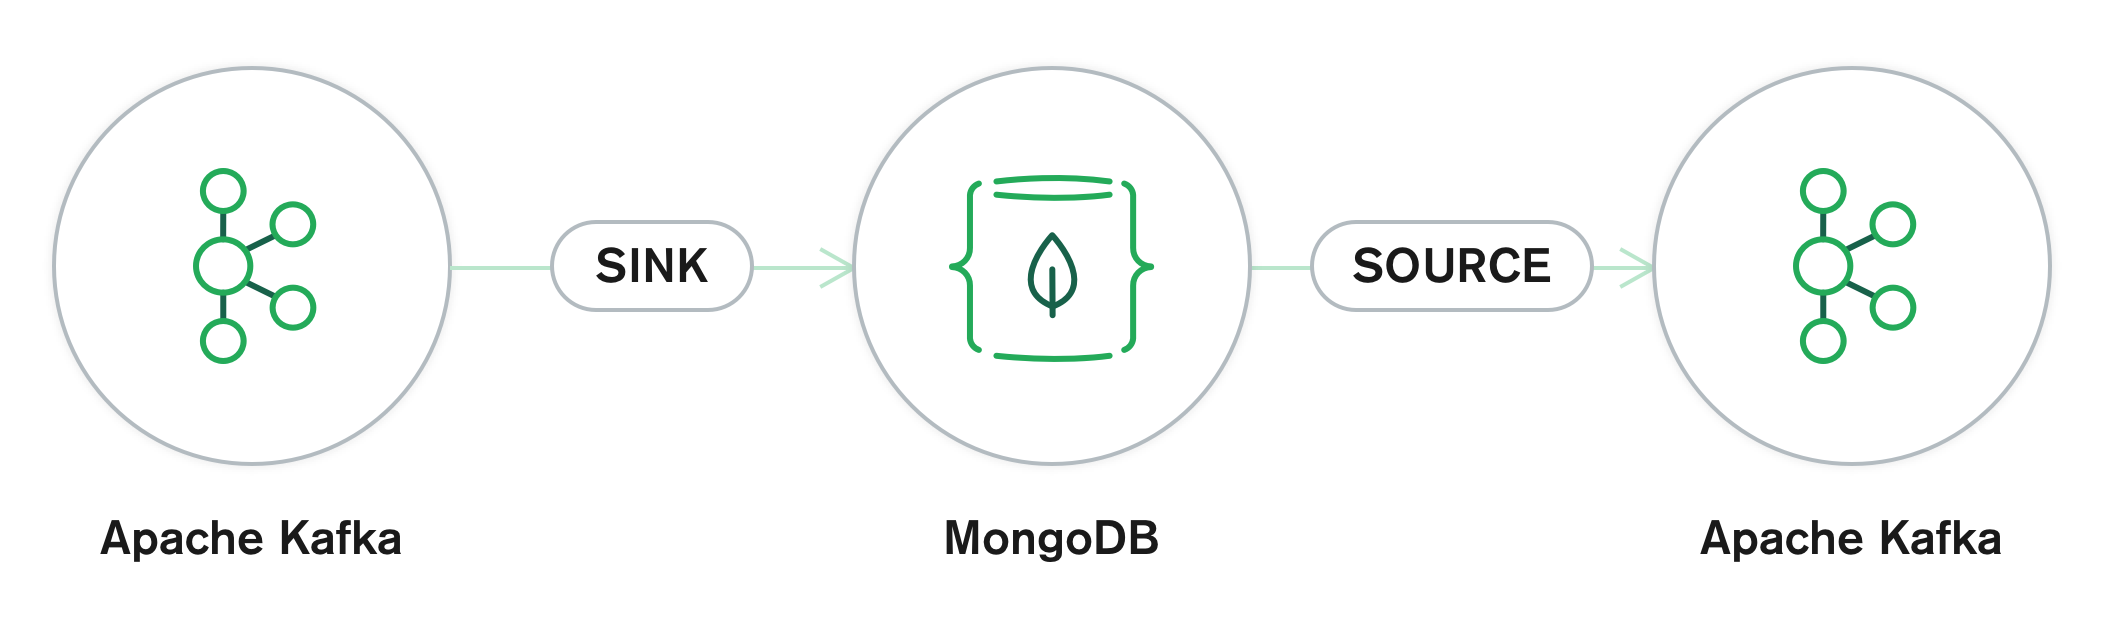
We have two major types of connectors, source connectors, and sink connectors.
Source connectors help you get data from external systems into Kafka topics. While sink connectors get data from Kafka topics to external systems.
For this project we will be making use of MongoDB Kafka connector provided by MongoDB. It serves as both a source and sink connector, meaning we can use it to get data from MongoDB to Kafka and from Kafka to MongoDB.
Kafka-Connect uses the connect-standalone command to start your connectors and like other Kafka commands, it has its own config file.
Then let’s configure Kafka-Connect to point to our plugins directory. To do this, open the connect-standalone.properties file in the config folder inside your Kafka directory and edit the plugins line to point to your plugins directory. This should look like the file below.
# Set to a list of filesystem paths separated by commas (,) to enable class loading isolation for plugins
# (connectors, converters, transformations). The list should consist of top level directories that include
# any combination of:
# a) directories immediately containing jars with plugins and their dependencies
# b) uber-jars with plugins and their dependencies
# c) directories immediately containing the package directory structure of classes of plugins and their dependencies
# Note: symlinks will be followed to discover dependencies or plugins.
# Examples:
# plugin.path=/usr/local/share/java,/usr/local/share/kafka/plugins,/opt/connectors,
plugin.path=/home/mcdavid/kafka/plugins
Download and Setup MongoDB Kafka Connector
Confluent is a great source to download connectors. One of the connectors they have is the MongoDB Kafka Connector. Go to this link to download the MongoDB Kafka Connector. When the download is complete, extract the folder to your home directory.
Navigate to your Kafka installation and create a plugins directory. Copy the jar file located in the lib directory of your extracted MongoDB Kafka connector. Then, paste it into the newly created plugins folder.
Configure MongoDB Kafka Source Connector
Next, let’s configure our source and sink connectors.
First is our source connector, which takes data from our MongoDB cluster into Kafka. The config file can be found in the etc directory of our MongoDB Kafka Connector installation directory with file name MongoSourceConnector.properties. Then paste the content below inside it.
| name=mongo-source | |
| connector.class=com.mongodb.kafka.connect.MongoSourceConnector | |
| tasks.max=1 | |
| # Connection and source configuration | |
| connection.uri=mongodb+srv://dbUser:dbUserPassword@cluster0-jj6uu.mongodb.net/test?retryWrites=true&w=majority | |
| database=sample_airbnb | |
| collection= | |
| topic.prefix=mongo | |
| poll.max.batch.size=1000 | |
| poll.await.time.ms=5000 | |
| # Change stream options | |
| pipeline=[{"$match": { "$or": [{"operationType": "insert"},{"operationType": "update"}]}}] | |
| batch.size=0 | |
| change.stream.full.document=updateLookup | |
| publish.full.document.only=true | |
| collation= |
Our configuration is divided into 4 parts. The first part gives the source Java class properties. While the second part is where we add our database config details, these includes the connection string from our first cluster, the name of the database we want to connect to, and the name of the collection. If we want to listen for changes on all collections we can leave the value of collections empty. Then, we add Kafka configurations, which include the prefix for our topics. By default, the connector uses the prefix to create a new topic for each collection in this format, <prefix>.<database name>.<collection name>. Lastly, we have our change streams configuration, This is where we declare our pipeline and configure other change stream options. There are different ways we can configure our source connector with change streams, you can read more on the official documentation here.
Configure MongoDB Kafka Sink Connector
Finally, let’s configure our sink connector. This will take data from Kafka into our target MongoDB cluster. Still in the etc directory of our MongoDB Kafka Connector installation directory, open the MongoSinkConnector.properties file and paste the following inside.
| name=mongo-sink | |
| topics=mongo.sample_airbnb.listingsAndReviews | |
| connector.class=com.mongodb.kafka.connect.MongoSinkConnector | |
| tasks.max=1 | |
| # Message types | |
| key.converter=org.apache.kafka.connect.json.JsonConverter | |
| key.converter.schemas.enable=true | |
| value.converter=org.apache.kafka.connect.json.JsonConverter | |
| value.converter.schemas.enable=true | |
| key.converter.schema.registry.url=http://localhost:8081 | |
| value.converter.schema.registry.url=http://localhost:8081 | |
| # Specific global MongoDB Sink Connector configuration | |
| connection.uri=mongodb+srv://dbUser:dbUserPassword@cluster0-kppha.mongodb.net/test?retryWrites=true&w=majority | |
| database=sample_airbnb | |
| collection=listingsAndReviews | |
| max.num.retries=2147483647 | |
| retries.defer.timeout=5000 | |
| ## Document manipulation settings | |
| key.projection.type=none | |
| key.projection.list=_id | |
| value.projection.type=none | |
| value.projection.list=_id | |
| field.renamer.mapping=[] | |
| field.renamer.regex=[] | |
| document.id.strategy=com.mongodb.kafka.connect.sink.processor.id.strategy.ProvidedInValueStrategy | |
| post.processor.chain=com.mongodb.kafka.connect.sink.processor.DocumentIdAdder | |
| # Write configuration | |
| delete.on.null.values=false | |
| writemodel.strategy=com.mongodb.kafka.connect.sink.writemodel.strategy.ReplaceOneDefaultStrategy | |
| max.batch.size = 0 | |
| rate.limiting.timeout=0 | |
| rate.limiting.every.n=0 | |
| # Change Data Capture handling | |
| change.data.capture.handler= | |
| # com.mongodb.kafka.connect.sink.cdc.debezium.mongodb.MongoDbHandler | |
| # Topic override examples for the sourceB topic | |
| topic.override.sourceB.collection=sourceB | |
In the first part of the config, we declare the topics we are to watch under the key – topics, the value is a comma-separated list of all the topics. As shown in the file, the topic we are watching is mongo.sample_airbnb.listingsAndReviews. This follows the naming convention in our source connector config – <prefix>.<database name>.<collection name> . After that, in the next part of the config we define the format we want to convert our data to from Kafka, we have the option of using either Avro format or JSON format.
Then, in the next part, we define our database configuration. It includes options for the connection uri, database name, and collection name. This is where we add the connection string of the second cluster we created.
Next, is the document manipulation settings. This is part is important, as it determines how each document would be structured before inserting it in the new database cluster. The id strategy we used is the ProvidedInValueStrategy strategy. This strategy replicates the id of the document coming from the first cluster. Then we have the post-processor chain, this is where we declare the order in which our document would be processed.
Lastly, is the write configuration setting. Here we choose to either create a new document when there is an update operation or just update the existing document based on the id. The strategy used here is the ReplaceOneDefaultStrategy,
There are different ways we can configure our sink connector to act on data coming from Kafka, you can read more on the official documentation here.
Testing it all
To test our implementation, first clear all the data from our two clusters.
Then start Zookeeper and Kafka servers. Next, start the Kafka connect standalone server.
To start the standalone server with MongoDB Kafka Connect from inside our Kafka directory, the command is bin/connect-standalone.sh <path-to-connect-standalone-config-file> [...<paths-to-our-connectors-config>] as shown below.
~/kafka_2.12-2.4.1> bin/connect-standalone.sh kafka_2.12-2.4.1/config/connect-standalone-1.properties mongodb-kafka-connect-mongodb-1.0.1/etc/MongoSinkConnector.properties mongodb-kafka-connect-mongodb-1.0.1/etc/MongoSourceConnector.properties
[2020-05-24 11:27:32,369] INFO Kafka Connect standalone worker initializing ... (org.apache.kafka.connect.cli.ConnectStandalone:69)
Open a new terminal instance and navigate to our MongoDB project created earlier. Then, run node changeStreamData.js. Now look at the data in both of our clusters and you’ll find that they are both identical.
That’s all for our Kafka setup with MongoDB and Kafka Connector.
Learning Tools
I am still testing the waters and possibilities with Kafka, below is a list of resources that helped my learning process
- Kafka Documentation
- Change Streams Docs
- MongoDB Kafka Sink Connector Guide
- MongoDB Kafka Source Connector Guide
- Apache Kafka Series – Learn Apache Kafka for Beginners v2
Learning Strategy
I was able to learn Kafka based on the problem I had. So implementing as I learned made it easier for me to understand the basic concepts faster.
Reflective Analysis
If you are trying to sync an on-premise database cluster with another one on the cloud, then it’s okay to have the Kafka server running on-premise too. But if all your clusters are running on the cloud, there are cloud solutions you can leverage on.
Another thing to keep in mind is that the data from Kafka to our Clusters might not always be in the same order as to how they were sent into Kafka.
Conclusion
Kafka has a lot of use cases beyond just connecting and syncing data stores, Kafka can be used to handle and stream Big Data. It currently has it’s inbuilt query language KSQL, which can be used to act on data saved in Kafka and perform analysis on them.
The code and config files for our project is hosted on Github you can take a look at it anytime for reference purposes.
If you are looking to use another service to handle data transmission, I wrote an article on using RabbitMQ as a queuing service.
Future directions of the project:
Add end-to-end latency metrics to Streams
Currently, the actual end-to-end latency of a record flowing through Streams is difficult to gauge at best. It’s also difficult to build real-time applications without some sense of the latency you can expect between the time that an event occurs and when this event is processed and reflected in the output results. Being able to bound this latency is an important requisite for many apps, and exposing this through metrics should go a long way towards enabling users to make the right design choices.
For example, application builders may be producing events in reaction to user actions. Without a sense of how long it will take for this new event to be reflected in the results, how do you know what to do next – should they show a brief loading screen before issuing an interactive query, or will they need to wait hours for this record to be processed? (Hopefully not). Without end-to-end latency metrics, this question is difficult to answer.
Hi Thanks for the great blog.
I have one question, the approach implements one-way sync, how to implement two-way sync?
Why don’t you use Mongodb Replica set?
Why don’t you answer question?