
Hire the author: Maina K
All code referenced on this django-tenant-schemas tutorial can be found here.
Introduction
Recently I was tasked with converting an existing Single Tenant API to a multi-tenant one. The API was created using the Django Rest Framework package and used the Postgres Database as a persistence layer, consequently, I settled on django-tenant-schemas after a few minutes of scouring the web for a solution.
django-tenant-schemas is a django based package that will enable you to perform the creation of client-specific schemas in a single Postgres DB instance, in addition, it’ll also aid in request routing ensuring data isolation is maintained, in other words, every client will only access data associated with their account. In short, it will help you convert the initially single-tenant API to a multi-tenant one with as minimal changes to your existing codebase as possible.
Glossary
- Single Tenant – A software architecture in which a single instance of the software runs on a server and serves a single tenant.
- Multi-Tenancy – A software architecture in which a single instance of the software runs on a server and serves multiple tenants.
- Postgres Schemas – named collections of tables, they are analogous to directories at the operating system level, except that schemas cannot be nested
Let’s get started
Prerequisites
- Basic knowledge of how REST APIs work
- Knowledge of Django and Django Rest Framework
- Understanding of the basic functionality of Git and GitHub.
- A running Postgres DB instance
Through this walk-through, you will be using an existing single-tenant API as the ‘test subject’. It’s a popular Django beginner tutorial app called the polls app, however, you will be using the API (REST) rendition of the app and include multi-tenancy on top of existing functionality. Find the final code in this GitHub repository.
Setting up PostgreSQL
Download and install Postgres software to your local machine, after that proceed to set it up as the default persistence layer for the API as opposed to the Django default SQLite.
Proceed to add below code to your setttings.py file.
| DATABASES = { | |
| 'default': { | |
| 'ENGINE': 'tenant_schemas.postgresql_backend', | |
| 'NAME': os.getenv('DB_NAME', 'pollsapi'), | |
| 'USER': os.getenv('DB_USER', 'postgres'), | |
| 'PASSWORD': os.getenv('DB_PASSWORD', 'postgres'), | |
| 'HOST': os.getenv('HOST', 'localhost'), | |
| 'PORT': os.getenv('PORT', 5432), | |
| } | |
| } |
Ignore the ENGINE value at the moment an explanation for it will be provided in due time. However, the remaining keys and their values should be familiar and self-explanatory. After that, you should add the database values to an env file as a security precaution. As such you should have a .env file on your root folder that resembles:
| SECRET_KEY=<your-very-secret-key> | |
| DB_NAME=pollsapi | |
| DB_USER=<your-db-user> | |
| DB_PASSWORD=<your-db-password> | |
| HOST=localhost | |
| DEBUG=True |
Django Tenant Schemas
Like explained before django-tenant-schemas is a django-based python package that will do most of the heavy lifting for us when it comes to restructuring our database architecture from single-tenant based to multi-tenant based. Install it by running:
pip install django-tenant-schemasMost of the steps that follow have already been included in the django-tenant-schema documentation therefore we will not delve into details, feel free to peruse the documentation at your leisure. Make the following edits to the settings.py file:
DATABASE_ENGINE
Alter the DATABASE_ENGINE to tenant_schemas.postgresql_backend to ensure that django-tenant-schemas can automatically create schemas in our database for each tenant.
DATABASE_ROUTERS
You will also need to alter the DATABASE_ROUTERS tuple in the settings.py. Therefore, add the code below:
DATABASE_ROUTERS = (
    'tenant_schemas.routers.TenantSyncRouter',
)
MIDDLEWARE_CLASSES
In the default django-tenant-schemas implementation you should also add the tenant_schemas.middleware.TenantMiddleware to the top of the MIDDLEWARE_CLASSES list, so that each request can be set to use the correct schema. Thus your MIDDLEWARE_CLASSES list should resemble:
| MIDDLEWARE = [ | |
| 'tenant_schemas.middleware.TenantMiddleware', | |
| 'django.middleware.security.SecurityMiddleware', | |
| 'django.contrib.sessions.middleware.SessionMiddleware', | |
| 'django.middleware.common.CommonMiddleware', | |
| 'django.middleware.csrf.CsrfViewMiddleware', | |
| 'django.contrib.auth.middleware.AuthenticationMiddleware', | |
| 'django.contrib.messages.middleware.MessageMiddleware', | |
| 'django.middleware.clickjacking.XFrameOptionsMiddleware', | |
| ] |
SHARED_APPS/TENANT_APPS/INSTALLED_APPS
It is important that you outline what apps are to be accessed publicly (SHARED_APPS) and ones that will be specific to tenants (TENANT_APPS). This will make it possible for django-tenant-schemas to save data accessed via said apps accordingly. INSTALLED_APPS is the default Django apps list and should remain as is but for one change tenant_schemas should be the placed at the top of the list:
| INSTALLED_APPS = [ | |
| 'tenant_schemas', | |
| 'django.contrib.admin', | |
| 'django.contrib.auth', | |
| 'django.contrib.contenttypes', | |
| 'django.contrib.sessions', | |
| 'django.contrib.messages', | |
| 'django.contrib.staticfiles', | |
| 'rest_framework', | |
| 'rest_framework.authtoken', | |
| 'pollsapi.polls', | |
| ] |
SHARED_APPS
SHARED_APPS is a new tuple/list defined to indicate to django-tenant-schemas the apps intended for public use. The tuple/list should resemble:
| SHARED_APPS = ( | |
| 'tenant_schemas', | |
| 'django.contrib.contenttypes', | |
| 'django.contrib.admin', | |
| 'django.contrib.auth', | |
| 'django.contrib.sessions', | |
| 'django.contrib.messages', | |
| 'django.contrib.staticfiles', | |
| 'rest_framework', | |
| 'rest_framework.authtoken', | |
| ) |
TENANT_APPS
TENANT_APPS finally will be a tuple/list that indicates which apps are accessible only to tenants, thus individuals without a defined schema will not be able to access apps on this tuple/list. Existing tenants while accessing these apps will have their data routed and saved to their respective schemas. The tuple/list should resemble:
| TENANT_APPS = ( | |
| 'django.contrib.contenttypes', | |
| 'pollsapi.polls' | |
| ) |
Tenant App
Create the tenant app by running the following code from your pollsapi root folder:
django-admin startapp tenantProceed to the models.py file in the newly created tenant app and add the following code:
| import uuid | |
| import os | |
| from django.db import models | |
| from tenant_schemas.models import TenantMixin | |
| # Create your models here. | |
| class Client(TenantMixin): | |
| REQUIRED_FIELDS = ('tenant_name', 'paid_until', 'schema_name', 'on_trial') | |
| tenant_name = models.CharField(max_length=100, unique=True, null=False, blank=False) | |
| tenant_uuid = models.UUIDField(default=uuid.uuid4, null=False, blank=False) | |
| paid_until = models.DateField() | |
| on_trial = models.BooleanField() | |
| created_on = models.DateField(auto_now_add=True) | |
| domain_url = models.URLField(blank=True, null=True, default=os.getenv('DOMAIN')) | |
| # default true, schema will be automatically created and synced when it is saved | |
| auto_create_schema = True |
The above represents the blueprint that will define our tenant. By default, django-tenant-schemas uses subdomains to detect the tenant and route the request accordingly, but in our case, since we only want to have a fixed URL for all our tenants we will be using a unique identifier (UUID) in our request headers to perform the task. Therefore, you will now proceed to add the custom middleware that will be responsible for routing our HTTP requests to the right tenant.
Custom Middleware
In the tenant app create a file called middleware.py and add the following code:
| from datetime import date | |
| from dateutil.relativedelta import relativedelta | |
| from django.core.exceptions import ObjectDoesNotExist | |
| from tenant_schemas.middleware import BaseTenantMiddleware | |
| from tenant_schemas.utils import get_public_schema_name | |
| class RequestIDTenantMiddleware(BaseTenantMiddleware): | |
| def get_tenant(self, model, hostname, request): | |
| try: | |
| public_schema = model.objects.get(schema_name=get_public_schema_name()) | |
| except ObjectDoesNotExist: | |
| public_schema = model.objects.create( | |
| domain_url=hostname, | |
| schema_name=get_public_schema_name(), | |
| tenant_name=get_public_schema_name().capitalize(), | |
| paid_until=date.today() + relativedelta(months=+1), | |
| on_trial=True) | |
| public_schema.save() | |
| x_request_id = request.META.get('HTTP_X_REQUEST_ID', public_schema.tenant_uuid) | |
| tenant_model = model.objects.get(tenant_uuid=x_request_id) | |
| print(tenant_model, public_schema) | |
| return tenant_model if not None else public_schema |
The above class inherits from django-tenant-schemas’s BaseTenantMiddleware subsequently overriding the get_tenant method where we add our own custom methodology for retrieving a tenant, we check the request headers for a unique UUID which we have attached to a field called X-Request-ID, if one is found we query the tenant model DB against it to identify the tenant if no tenant is found we return the public tenant giving the user the liberty to access apps that are allowed to the public.
We need to make changes to the settings.py file and point the tenant schema middleware to use our custom defined middleware as opposed to the default. We also need to define a new variable that points to our tenant model as a django-tenant-schemas prerequisite. In your settings.py add/alter the following parts, add the variable below. It points to your tenant model
TENANT_MODEL = 'tenant.Client'Change the default tenant middleware from the MIDDLEWARE list to point to your newly created custom middleware, change:
'tenant_schemas.middleware.TenantMiddleware',to
'pollsapi.apps.tenant.middleware.RequestIDTenantMiddleware',We also include the newly created tenant app to the SHARED_APPS tuple/list as well as the INSTALLED_APPS lists:
| SHARED_APPS = ( | |
| 'tenant_schemas', | |
| 'pollsapi.tenant', | |
| ... | |
| ) |
| INSTALLED_APPS = [ | |
| 'tenant_schemas', | |
| ..... | |
| 'pollsapi.tenant' | |
| ] |
Running migrations
We can now run migrations on our API to populate our database with the required tables. Run:
python manage.py makemigrationsThe terminal response should resemble:
WARNINGS:
?: (tenant_schemas.W003) Your default storage engine is not tenant aware.
	HINT: Set settings.DEFAULT_FILE_STORAGE to 'tenant_schemas.storage.TenantFileSystemStorage'
Migrations for 'tenant':
  pollsapi/tenant/migrations/0001_initial.py
    - Create model Client
You can ignore the default storage warning, we will not be covering that and it should not affect our desired functionality. You can now proceed to run the migrate command. django-tenant-schemas has modified the migrate command in order to ensure that it runs on the correct schemas as specified in the settings.py file. Thus instead of running the usual migrate command, you should run:
NOTE: Never use migrate as it would sync all your apps to public!
python manage.py migrate_schemasSince we are yet to create a tenant the command above should create the public schema only. We shall create a tenant next
Creating a tenant
We will create a custom Django commandline command in order to make the process of creating a tenant less hectic. Create a python package folder in the tenant app and label it management inside the folder create another one labelled commands and in it create a file called client.py and add below code:
| import datetime | |
| from django.core.management.base import BaseCommand, CommandError | |
| from pollsapi.tenant.models import Client | |
| from django.utils.text import capfirst | |
| from django.core import exceptions | |
| class Command(BaseCommand): | |
| help = 'Create a client' | |
| def add_arguments(self, parser): | |
| """ | |
| Args: | |
| parser: | |
| Returns: | |
| """ | |
| for field_name in Client.REQUIRED_FIELDS: | |
| parser.add_argument('--%s' % field_name, action='append', | |
| help='Specifies the %s for the superuser.' % field_name, ) | |
| def handle(self, *args, **options): | |
| user_data = {} | |
| for field_name in Client.REQUIRED_FIELDS: | |
| field = Client._meta.get_field(field_name) | |
| user_data[field_name] = options[field_name] | |
| while user_data[field_name] is None: | |
| message = self._get_input_message(field) | |
| input_value = self.get_input_data(field, message) | |
| user_data[field_name] = input_value | |
| tenant = Client.objects.create(**user_data) | |
| tenant.save() | |
| if options['verbosity'] >= 1: | |
| self.stdout.write("Client created successfully.") | |
| def get_input_data(self, field, message, default=None): | |
| """ | |
| Override this method if you want to customize data inputs or | |
| validation exceptions. | |
| """ | |
| raw_value = input(message) | |
| if default and raw_value == '': | |
| raw_value = default | |
| try: | |
| val = field.clean(raw_value, None) | |
| except exceptions.ValidationError as e: | |
| self.stderr.write("Error: %s" % '; '.join(e.messages)) | |
| val = None | |
| return val | |
| @staticmethod | |
| def _get_input_message(field, default=None): | |
| return '%s%s%s: ' % ( | |
| capfirst(field.verbose_name), | |
| " (leave blank to use '%s')" % default if default else '', | |
| ' (%s.%s)' % ( | |
| field.remote_field.model._meta.object_name, | |
| field.m2m_target_field_name() if field.many_to_many else field.remote_field.field_name, | |
| ) if field.remote_field else '', | |
| ) |
The above code will enable us to create a tenant in a similar fashion we would a django superuser. Lets create our first tenant, run below command and populate the fields as prompted:
python manage.py clientIt should look something similar to this:
Tenant name: Pollsmaster
Paid until: 2020-05-30
Schema name: pollsmaster
On trial: False
If the command is successful a new tenant, as well as their schema, should be created and the migrate command for the schema run successfully.
Finalizing on the tenant app
You will need to add a few things in the tenant app, before you can test out the functionality. In the tenant app create a serializer.py file and add below code:
| from rest_framework import serializers | |
| class ClientSerializer(serializers.Serializer): | |
| tenant_uuid = serializers.UUIDField() | |
| tenant_name = serializers.CharField() |
In the views.py file add the following:
| from rest_framework import viewsets, status | |
| from rest_framework.exceptions import ValidationError | |
| from rest_framework.permissions import AllowAny | |
| from rest_framework.response import Response | |
| from pollsapi.tenant.models import Client | |
| from pollsapi.tenant.serializers import ClientSerializer | |
| class ClientViewSet(viewsets.ViewSet): | |
| permission_classes = (AllowAny,) | |
| serializer_class = ClientSerializer | |
| def create(self, request): | |
| client = request.data or {} | |
| tenant_name = client.get('tenant_name') | |
| if tenant_name is None: | |
| raise ValidationError('A tenant name is mandatory.') | |
| tenant = Client.objects.get(tenant_name=tenant_name) | |
| serializer = self.serializer_class(tenant, many=False) | |
| return Response(serializer.data, status=status.HTTP_200_OK) |
add a urls.py and add code below:
| from django.urls import path, include | |
| from rest_framework.routers import DefaultRouter | |
| from pollsapi.tenant.views import ClientViewSet | |
| router = DefaultRouter(trailing_slash=False) | |
| router.register(r'client', ClientViewSet, base_name='clients') | |
| urlpatterns = [ | |
| path('', include(router.urls)), | |
| ] |
Testing everything out
Start up the server and head over to your favorite API testing tool. I’ll be using Insomnia.
Go to the endpoint localhost:8000/client to retrieve your tenant UUID. If successful you should receive a response of the tenant name and their UUID. Your request should look something similar to this:
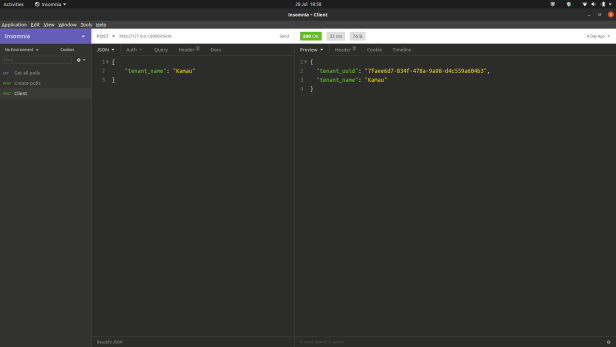
Copy the tenant_uuid , we’ll use it to make requests to the polls app.
Head over to the create polls endpoint localhost:8000/polls/ add the tenant_uuid to the headers and assign it to X-Request-ID :

Calling the request above should create a new poll. To have a comparative demonstration you can create a new tenant and create multiple polls and observe the data isolation in practice.
Learning Strategy
While doing research for this project, I started off with trying to understand what exactly multitenancy was. On getting a high-level understanding of what multi-tenancy entailed the next step was deciding the methodology to consider in implementing multitenancy to the existing API. In that regard this article from Microsoft on the different implementations of multitenancy proved invaluable. Settling on a methodology entailed weighing the pros and cons which partially included, maintainability of the database, restructuring of the existing codebase, and, most importantly, how the API would scale with an increase in tenants.
In retrospect….
In depth research before writing the first line of code was the biggest take from the entire process. It was important to have a prior understanding of how extensive the codebase would have to be altered as well as whether the use of a third party package was necessary. It was also important to have an implementation plan, that is, a literal step by step plan to be undertaken in bringing the full implementation into fruition.
In conclusion
This particular project took longer than I had predicted. Having run a conservative estimate of 10 hours it took twice the time.
I hope this short example excites the reader into delving deeper into multi-tenancy architecture. Exploring the inner workings of Postgres was exciting and eye-opening. The example above can be extended to include tenant-specific authentication and authorization.
You can also find my other blogs, on pytest, on Apache and on SendGrid.
Tools for further study
Microsoft multi-tenancy article
PostgreSQL schemas documentation
Django Tenant Schemas documentation
Citations
The Featured Image is courtesy of wikimedia commons and can be found here
Get the code from GitHub on this link
Scalability and Performance
Tenants usually don’t share the same resources and hardware use. The level of use by one tenant might greatly exceed another.
Thus, an application’s performance should be scalable, while performing well with the resources it has. And this should be done in a way where a tenant’s use of resources shouldn’t affect the other tenants’ performance.
Performance and scalability can be tested using tools such as JMeter and Load Runner.
Hi I followed you your article above, firstly thank you for putting this together as I have been looking to migrate my application to a single URL.
My question I have is if I am running the django-rest-framework and I post my username and password to my token auth endpoint I get that the
“The above exception (relation “system_resources” does not exist LINE 1: …is_staff”, “system_resources”.”is_superuser” FROM “system_re… ^ ) was the direct cause of the following exception:.”
If I am understanding this correctly it seems that when I post my authentication details to the endpoint its actually trying to look for the table that contains my user access details from the public schema and its not querying it from the tenant schema which it should be doing.
Should I be applying my migration files in a specific order perhaps?
Any thoughts on this would be appreciated.
Hello Duncan thanks for your remarks, you are right the authentication should be publicly accessible. This is actually one of the drawbacks to using this particular implementation. My suggestion is to make the authentication table public but have every user attached to a schema by creating a relationship between the tenant model and user model, that way the only time your users have to access the public schema is to access the authentication_users table during registration and login.
Hi Maina, thank you for the feedback, something im struggling to get my head around is when a user submits their username and password they will be authenticated against the public schema table, once authenticated we then need to retrieve their tenant name in order to obtain the uuid which is then submitted with each request in order for the middleware to handle the routing of requests.
Is my thinking accurate on how the process flow should work?
Yes Duncan your assessment is accurate, the user is created in the public schema and is also authenticated there. In the user model you have a field `tenant_schema` that contains the schema name attached to said user, thus upon authentication we pull the schema name from the User’s model and perform all other CRUD functionality associated with the User on their assigned schema
PS: I noticed in my earlier comment I referred to you as David instead of Duncan.My apologies.
Hi Mainak,
Hope you keeping well, what do you use as your front end application, if Django is your API.
Hello Duncan, I’m doing well, hope you are as well. The project I worked on had a Single Page Application developed in React and Typescript. Seeing that I worked solely in the Backend I can’t offer a lot in the way of compatibility between the two, but everything was working well to my knowledge.
Hi There, Maina! Great tutorial, it’s very detailed and well explained. I have an issue when trying to run the “python manage.py makemigrations” command. The message I get is the following:
SystemCheckError: System check identified some issues:
ERRORS:
?: (tenant_schemas.E002) You have TENANT_APPS that are not in INSTALLED_APPS
HINT: [‘dashboard.apps.DashboardConfig’, ‘users.apps.UsersConfig’, ‘datafactory.apps.DatafactoryConfig’, ‘target.apps.TargetConfig’, ‘preferences.apps.PreferencesConfig’]
?: (tenant_schemas.E003) You have SHARED_APPS that are not in INSTALLED_APPS
HINT: [‘tenant.apps.TenantConfig’]
This is a snippet from my settings.py where I think the problem lies:
TENANT_APPS = [
‘django.contrib.contenttypes’,
‘dashboard.apps.DashboardConfig’,
‘users.apps.UsersConfig’,
‘datafactory.apps.DatafactoryConfig’,
‘target.apps.TargetConfig’,
‘preferences.apps.PreferencesConfig’,
]
SHARED_APPS = [
‘tenant_schemas’,
‘tenant.apps.TenantConfig’,
‘django.contrib.contenttypes’,
‘django.contrib.admin’,
‘django.contrib.auth’,
‘django.contrib.sessions’,
‘django.contrib.messages’,
‘django.contrib.staticfiles’,
# ‘rest_framework’,
‘rest_framework.authtoken’,
]
INSTALLED_APPS = [
‘tenant_schemas’,
‘django.contrib.admin’,
‘django.contrib.auth’,
‘django.contrib.contenttypes’,
‘django.contrib.sessions’,
‘django.contrib.messages’,
‘rest_framework.authtoken’,
‘django.contrib.staticfiles’,
‘dashboard.apps.DashboardConfig’,
‘users.apps.UsersConfig’,
‘datafactory.apps.DatafactoryConfig’,
‘target.apps.TargetConfig’,
‘preferences.apps.PreferencesConfig’,
‘tenant.apps.TenantConfig’,
‘debug_toolbar’,
]
Thank you for your time and for putting together this great tutorial.
Hello Gregorio, your issue is not something i experienced while working with Django tenant schemas, it seems very specific to how the rest of your code is setup and I don’t have enough knowledge or information to directly help you out. However looking around the internet for something similar i realized that it’s a problem that a couple of people are facing and have had solutions for the same, check below links and see whether any of the suggestions provided resolve your issue.
Happy bug hunting.
https://github.com/bernardopires/django-tenant-schemas/issues/443
https://github.com/bernardopires/django-tenant-schemas/issues/561
Hi Maina! Thanks for the links, they were really useful for hunting down that pesky bug. I managed to follow the tutorial and get my project running.
Hi, thanks for the tutorial. I have encountered error when using “django-tenant-schemas” and I found recommendation to switch to “django-tenants” which is fork or clone being more supported. I think I have fixed all the issues regardint to this approach, but I have encountered an error: # AttributeError: ‘Settings’ object has no attribute ‘TENANT_DOMAIN_MODEL’
Maybe you could recommend what steps should I take to fix it? I do not need domain model, but it is rooted far into the package… 🙂 Thanks!
Hello @wecoon,I am not familiar with django-tenants but a quick look at their documentation suggests a very similar approach, I’m not certain but maybe the error you’re facing might be related to this part of your code in the setings.py
“`
TENANT_MODEL = “customers.Client” # app.Model
TENANT_DOMAIN_MODEL = “customers.Domain” # app.Model
“`
It seems django-tenants expects that you provide a `TENANT_DOMAIN_MODEL` and your error seems to point to a lack thereof.
Hi Mainak
Wonder if you can assist, can you think of a way to store the schema_name in the user model into the schema_name field when the user is being created for the first time? This is the command I run “python manage.py tenant_command createsuperuser –schema=”companydomainname_co_za” and would like the schema to be saved to the schema_name field once the super user is created.
Any suggestions?
Thanks.
Since you are providing the schema name before you create the user, you can use the same schema name that you provided during client creation to populate the
schema_namefield in theUsermodel. So for instance afteruser.set_password(password)you could adduser.schema_name=schema_namebefore savingHi Mainak
Hope you can shed some light on why the above middleware file is not working for me.
I am now passing the uuid to the middleware, but still getting Unauthorized access when trying to call an API endpoint.
The below is a debug log from django
(0.001) SELECT “tenants_tenant”.”id”, “tenants_tenant”.”schema_name”, “tenants_tenant”.”tenant_uuid”, “tenants_tenant”.”tenant_name”, “tenants_tenant”.”paid_until”, “tenants_tenant”.”on_trial”, “tenants_tenant”.”created_on”, “tenants_tenant”.”domain_url” FROM “tenants_tenant” WHERE “tenants_tenant”.”tenant_uuid” = ‘f6d53ae8-c8e5-49a3-a680-93f6944a0779’::uuid LIMIT 21; args=(UUID(‘f6d53ae8-c8e5-49a3-a680-93f6944a0779’),)
Unauthorized: /api/v1/system/myorg/logos/
“GET /api/v1/system/myorg/logos/ HTTP/1.1” 401 58
I can also confirm we are sending the uuid with every header request.
Is my assumption right that the above select query is routing the requests to the correct schema?
Hello Duncan, the uuid is not meant to act as an authentication/authorization mechanism is just aids in routing an already authenticated/authorized user to the correct schema, when a user is authenticated they should have a
tenant_schemafield attached to their User model so when they log in we can be able to pull the right schema for them and route their data accordingly. Remember the User login information should be in the public schema and thuc the login mechanism should access the public schema and not the tenant based private one.Thank you for the response, I think the middleware is working, but something at the rest side is causing the unauthenticated notification, will need t troubleshoot a bit further.
Hi there, Maina!
Hope you’re doing well. I’m having some issues when trying to run the migrate_schemas command in order to add new tables to a tenant schema. I have already ran the makemigrations command and the migrations file show the new model that should be created. This is the error I get in the console after running migrate_schemas:
[standard:rocketx] Operations to perform:
[standard:rocketx] Apply all migrations: admin, auth, authtoken, contenttypes, dashboard, datafactory, datalake, preferences, sessions, target, tenant, users
[standard:rocketx] Running migrations:
[standard:rocketx] Applying dashboard.0002_auto_20201211_1502…
Traceback (most recent call last):
File “/home/greco/miniconda3/envs/mag/lib/python3.8/site-packages/django/db/backends/utils.py”, line 84, in _execute
return self.cursor.execute(sql)
psycopg2.errors.DuplicateTable: relation “dashboard_strategy_numerical_filter” already exists
The above exception was the direct cause of the following exception:
…
django.db.utils.ProgrammingError: relation “dashboard_strategy_numerical_filter” already exists
This relation called “dashboard_strategy_numerical_filter” already exists in the tenant schema, so is there a way to tell django to avoid relations and tables that already exist?
This is really troublesome because I can’t add any new tables without having to drop the db and creating it again, which isn’t an option since I have a lot of data in the db.
Hope my explanation clear enough. Thanks a lot!
Grego
Hello Grego, this is an issue I have not faced in this project but seems to be an issue with django migrations at times. I cannot advise on how exactly you can resolve this issue because it’s not something that have been able to navigate in the past without having to drop the DB which in your case is a no go. However you can try and check out this links on SO and see whether they can help you debug your issue. Good luck.
https://stackoverflow.com/questions/29830928/django-db-utils-programmingerror-relation-already-exists
Hi Maina!
I found a solution. I went to the django_migrations table in my different schemas and deleted the rows representing old migrations from the django apps I needed to update. Once I did that, django was able to detect the migration files and run them without issues.I hope this can help to others having the same issue. Thank you!
Hey, dear! I’m getting this following error!
django.core.exceptions.ImproperlyConfigured: Cannot import ‘polls’. Check that ‘pollsapi.polls.apps.PollsConfig.name’ is correct.