
Introduction
How to “Dockerize, deploy, and CI your Spring+Angular web app”? I will present a way to deploy a web application(Spring+Angular). I will use Docker containers to Dockerize it, Ansible to deploy, and Jenkins environment to run the tests(CI). The project is available on this Github Link.
Summary: I will explain the particular web application, then I give the details about testing (Continuous Integration CI) with Jenkins, after that the Dockerizing of the frontend and backend, how to write the docker-compose file, configure NGINX and write the Ansible script.
Glossary
- Dockerize an application: To Dockerize an application means to create a docker container in which the application runs
- Access Token: is a code which gives the sender permissions to view/edit the GitHub repository
- NGINX is a web server that can also be used as a reverse proxy, load balancer, mail proxy, and HTTP cache.
Prerequisites
You need to have a basic understanding of the following to follow along:
- JavaScript and AngularJs
- Have Docker, Docker-Compose, Ansible, and npm installed on your machine
- Server available on the internet, or a virtual server created using Vagrant (you will not be able to configure GitHub webhooks this way)
Steps To Reproduce
I am suggesting that you read the whole article and try to produce, copy the steps explained in the text that follows. In my opinion, you will get the most out of this article if you have your Spring+Angular application, but feel free to clone my GitHub repository.
The Web application
Formula One is a web application. It is built using Spring Boot API and AngularJS on the front-end. I will not explain the coding part too much here. I will focus mainly on the functionality and deployment of this application.
The API is developed using Spring Boot with Java. It has a few controllers that accept different parameters. The API uses these parameters to form a SPARQL query. The query is sent to the DBpedia endpoint and returns these results as a JSON.
The frontend is developed using AngularJS. Where the user input (change of state) is formatted and sent to the API when the application receives a response it displays the results to the user. This application has some hard-coded parameter values to get the design better (example: number of drivers in search result). But the API is fully flexible and able to return different results depending on the sent parameters.
The application is a website that shows information for Formula One, drivers, and teams from Formula One. The user can change the language of the website’s content, search for a driver/team with the whole name or just a part of it. There is a web page where the user can see more information about a particular driver or team. And the best thing is that the application uses Linked Data. This means that almost everything contains links that the user may visit and get all the information available on DBpedia. The next few pictures will show some of the functionalities and the design of the application.

Picture 1 Homepage of the application

Picture 2. Search page for drivers in French

Picture 3. Details for a driver
Testing with Jenkins
Back to the question of how to “Dockerize, deploy and CI your Spring+Angular web app”? I will first explain how to test the web application with Jenkins.
I use Jenkins for testing and Github for Version Control. Every push on Github would trigger a build for the Jenkins job. However, this is not practical if the results are not displayed to the developer. I configure Jenkins to send the results back to Github and then they are displayed. To make this possible Jenkins must be available on the internet. To accomplish this I made a free azure account with free 200$ credit in the first month. I used this server for a virtual machine with Ubuntu, where I also deployed my application.
Github needs to trigger the builds on Jenkins. This is easy to set, just follow the next few steps. Go into the project settings->webhooks. The webhook is a URL to our Jenkins with “/github-webhook/” added at the end and sets the Content-type to application/json. To display the results from the build, Jenkins needs an access token from our account for the repository. This can be accomplished by the flow: Settings-> Developer Settings -> Personal access tokens -> Generate new token. This token will be shown only once and should not be published or pushed to a git repository.
Jenkins runs in a Docker container. The image uses Jenkins’s official image from DockerHub. It also updates the application manager data, installs Docker, and installs a few packages. The code below shows the Dockerfile for Jenkins.
Creating The Jenkins Job
The Jenkins job is created by clicking on New Item -> Freestyle Project, where the name and description of the job are entered. More importantly here is the place where the job is being configured. In this project, the web application that needs to be deployed has only 3-4 Spock tests. These tests are only for demonstrational purposes. If this application was going to be a real-life project it would have many more tests. However, that would not affect the configuration for the testing or deployment in any way.
The application is on Github, so under Source Code Management Git is selected, the repository URL is entered, every branch is specified and under Build Triggers the option “GitHub hook trigger for GITScm polling” is selected (Picture 5).
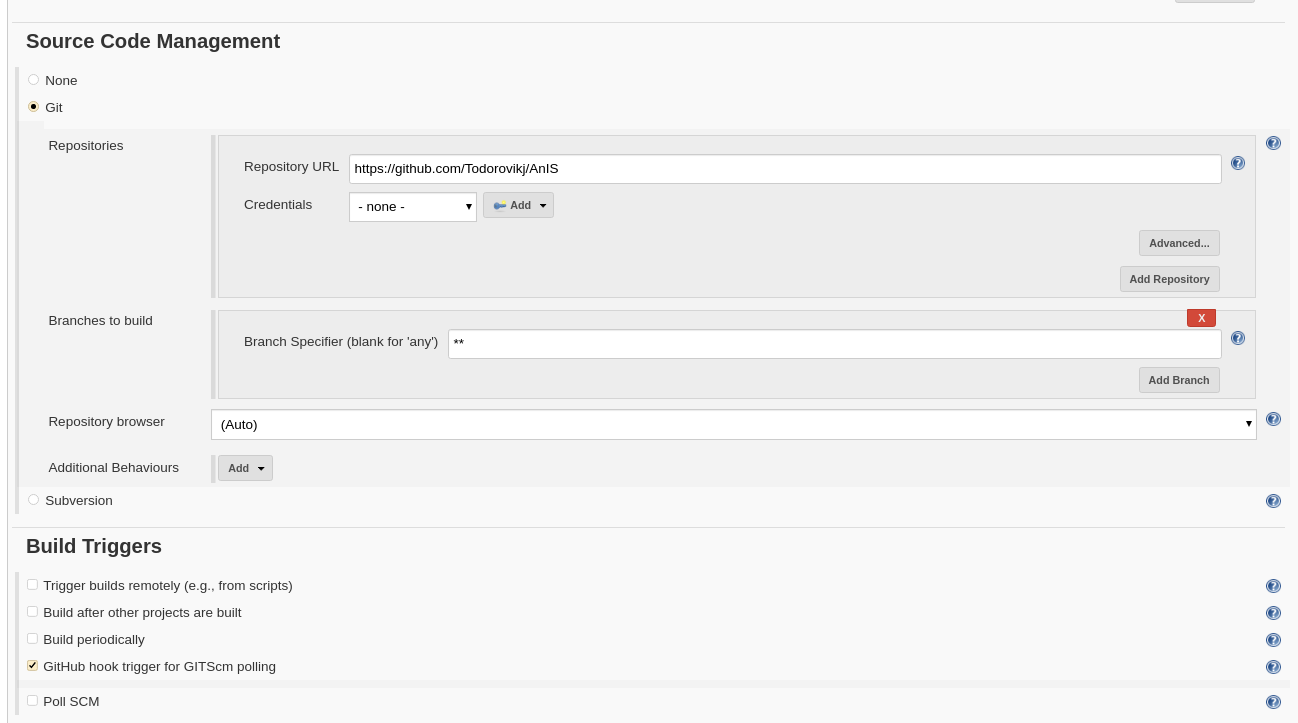
Picture 4
Before really invoking the build of the tests, Jenkins executes a shell curl command. This is a build task in Jenkins. This command sends a post request to Github. This tells Github to display status pending while the build does not finish. Similarly, Jenkins notifies Github about the success/failure of the build. (Picture 7 shows a similar request).
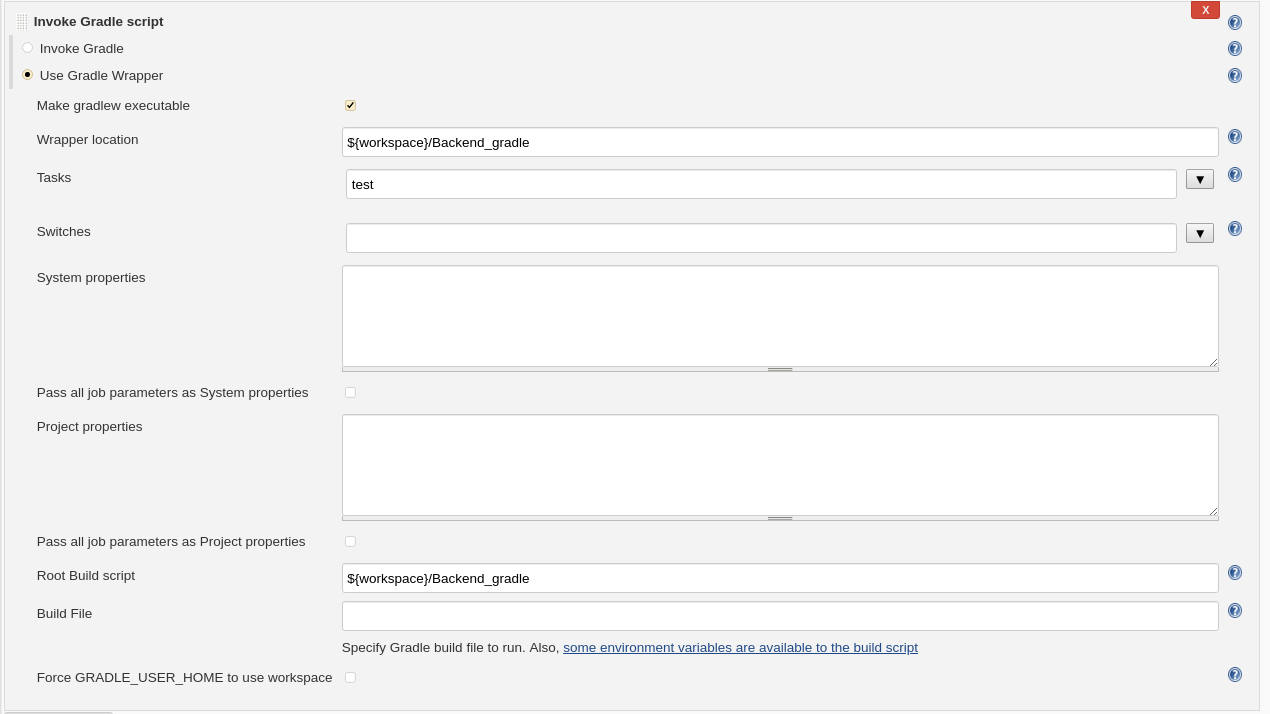
The real build in this Jenkins task is building the Gradle tests and making sure they are all successful. To accomplish this, I add another build task. The task is to Invoke Gradle Script with the Options Make Gradlew executable selected. Wrapper Location set to the location of our Gradle application, in this case. Tasks set to test (there may be more separated with empty spaces between them). And finally under Advanced -> Root Build script the location of our Gradle Application in this case. Picture 6 shows this configuration.
Picture 5
Notify Github
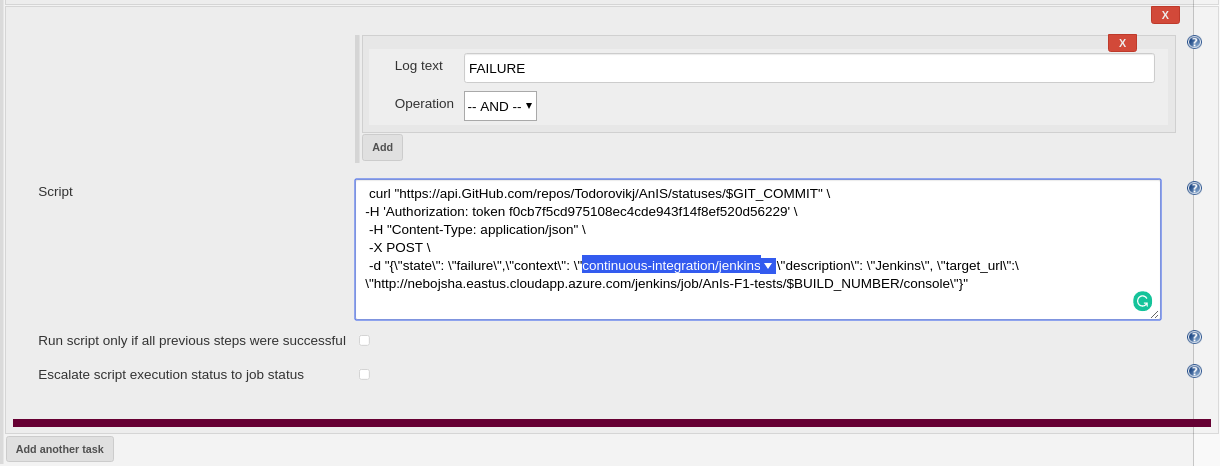
To notify Github about the result from the build, I use post-build actions. There are a few ways to accomplish this. In this case, there are two Post-build Tasks. They look for text SUCCESS/FAILURE in the build log. When they find the text, they execute a curl command to notify Github about the result.
I use the same script as in the first build task to notify Github that the build is pending with different text. The curl command sends a post request to the Github repository with the commit id. Then sets the authorization header to the access token that is generated from Github, sets Content-Type to application/json and defines the body of the request with appropriate status, context to “continuous-integration/jenkins”, description and target_url which is the URL from our Jenkins job and the particular build number with /console added at the end.
Picture 6
Dockerize the backend
The next step on our topic “Dockerize, deploy and CI your Spring+Angular web app” is to dockerize the back-end.
To Dockerize a Spring web application we need a jar file. Gradle generates a jar file by executing ./gradlew clean build in a terminal in the folder of the application, this command generates the .jar file and saves it in /build/libs.
The Docker container for the backend is ‘f1-backend’. The image creates a folder myApp in the home directory. Declares that this location is a volume (More details with the docker-compose file), and sets the working directory to /home/myApp. I am doing this so I can easily run the application with an Entrypoint command, which runs any jar file it finds in the current working directory (our app). The code below shows the Dockerfile.
Dockerize the frontend of Formula One
The next step is to dockerize the front-end. To Dockerize an AngularJS application, the command ‘ng build –prod –base-href=”/”’ needs to be run inside the folder of the application. It will save the files that we need to deploy the application in the /dist/application_name.
The container that this application runs in is f1-angular. The image is a pure Nginx container that we can download from DockerHub. I use volumes to serve the application. I also changed the global.conf Nginx file. The global.conf file sets the server to listen on port 4200, sets some logging parameters, default index files, root location of our application, turns on gzip. It also sets a reverse-proxy for every request sent to /api/ to go to our backend application. And finally, it maps every request with his parameters to /index.html. This is our Angular application. The try_files does mapping of the arguments and query parameters. The code below shows the global.conf file.
Configure NGINX
When deployed on the server every docker container can be set to work on a particular port. The application is easily accessed with the Server_URL:port_number. This is not user-friendly. To make these URLs user-friendly, I use Nginx. The same image used here is used in the container for the front-end application and the global.conf file is very similar. It only contains different mappings for the URLs. The code below shows the global.conf file.
Docker-compose file
A really important step from the topic (Dockerize, deploy, and CI your Spring+Angular web app) is to make the running and stopping of containers easy. I use Docker-compose to implement this.
Docker-compose runs more containers with one command. And it is a lot more readable than running each container separately.
The compose file creates a network named f1_app to make communication between the containers easier. All the containers from this project are members of this network.
The container that holds the backend application is f1-backend. This container has the volume from our_application_folder/build/libs mounted to home/myApp. This is the jar file from the back-end. He uses ports 8080 mapped to 8080 on the container.
The container that holds the frontend of the application is f1-angular. He uses the port 4200, mapped to 4200, has 2 volumes.
The Jenkins container has two ports for communication. The user uses port 8000 to communicate with Jenkins. Jenkins uses the other one for his communication. Jenkins also has two volumes, environment variable JENKINS_OPTS set to “ –prefix=/jenkins” (just to make Nginx configuration easier).
The “global” NGINX container runs on port 80 (default for Http) and has one volume that is global.conf file.
The code below shows the docker-compose file.
Ansible Playbook for deployment
With the use of Ansible, the deployment on a new machine or an old machine is only one command in the terminal. The playbook used here has a few plays.
The ansible.cfg file has some parameters set. We need these parameters to make the ssh connection to the server.
The inventory file represents the hosts and it has one line that is the name of the server, IP of the server, and port to ssh to.
azure-server ansible_host=40.121.219.111 ansible_port=22The first play from the playbook installs the required packages for the deployment.
The second play copies the files that we need to run the applications and configuration files and creates a directory for the application.
The third play makes the directory jenkins_theme and sets the appropriate user privileges.
The fourth and last play goes to the folder with the docker-compose file. It then stops docker-compose if it was running and after that runs docker-compose start -d again, so the application is live again (Picture 16). In this way, the down-time is minimum, because all the containers are running until they execute a stop command with cached/compiled data from the previous version of the application.
Learning tools
There are a lot of tutorials and tools online on how to succeed in the current project, but none of them is a complete guide like this one. I recommend using:
- Docker Hub: https://hub.docker.com/
- Docker documentation (Docker compose documentation is available here as well): https://docs.docker.com/
- Ansible documentation: https://docs.ansible.com/
- Jenkins documentation: https://www.jenkins.io/doc/
Learning Strategy
I used the tools above and a few how-to posts for each step to get up to speed. I also used Google and Stack Overflow to get more information whenever I get stuck. Above all, I recommend you take advantage of the internet!
I am always reading official documentation or similar posts to this one to learn the technologies mentioned and used. The whole project is available online on this Github Link.
Reflective analysis
It was not a simple process for me to create this project but it helped me a lot and I gained lots of experience in Docker, Ansible, and NGINX.
There is a whole lot you can do with the technologies used. It makes the deployment of an application easier for every developer, and it also helps to understand the basics of DevOps or daily tasks of system admins.
You can easily adapt this project to test and deploy any other Spring+Angular application, or any other web application with the methods used.
Conclusion
The purpose of this project is to make the end to end development and deployment as easy as possible that is why I am writing on this topic (Dockerize, deploy and CI your Spring+Angular web app). I am also an engineer that wants to learn the skills of a DevOps engineer, I will continue to make projects similar to this one. I spent one week on this project, but I find it productive and fun. Please consider that I am learning new skills as I make the projects, and this is my first project that is end to end from development to “production”.
If you are interested to read more and improve your skills toward being a DevOps Engineer, feel free to read more about testing and documentation on this post.
Hi, stephenilori,
Thank you for your feedback, I really appreciate it.
However, I would not agree on the points that I should explain more details about Docker, CI, and the other technologies mentioned, because on the other hand the post would be too long and lots of users would think that it does not contain the information they are looking for. Furthermore, I think that it is a tutorial for someone who already has some experience, a beginner, who wants to extend his knowledge or someone who already knows or has seen something similar just does not have the knowledge to fill the pieces together.
Hello Necotodorovick. I read your blog and I think personally, you did a great job. But I have a few suggestions to share.
I think it will be nice if you’d introduce readers to the following technologies. Docker, Continuous Integration, and a little about Angular.
Towards the end of your write-up, you could also talk about the advantages of docker to developers and software companies.
Aside from this observation, I personally think you have done a good job with the project and it’s a lot easier for folks with docker experience to understand
Hi, stephenilori,
Thank you for your feedback, I really appreciate it.
However, I would not agree on the points that I should explain more details about Docker, CI, and the other technologies mentioned, because on the other hand the post would be too long and lots of users would think that it does not contain the information they are looking for. Furthermore, I think that it is a tutorial for someone who already has some experience, a beginner, who wants to extend his knowledge or someone who already knows or has seen something similar just does not have the knowledge to fill the pieces together.