
Hire the author: Akinsanya A

Lately, the whole world has been drifting towards the application of Artificial Intelligence technology (such as chatbots) in our daily activities to make life easier. Chatbots are AI-driven systems that can be used to automate literally any task.
I will give a guide on how to build a chatbot by building a simple order-tracking chatbot on the Telegram messaging platform, that uses Dialogflow and Wit AI for Natural language processing. Telegram allows developers to build conversational chatbots on its platform through HTTP request to its APIs on the Telegram platform.
Key terms:
A Chatbot: is a conversational Artificial Intelligence (AI) software that can simulate a chat with a user in natural language through messaging applications, websites, mobile apps or through the SMS.
An Utterance: is whatever the user inputs in a chat. For example, if a user types “I want to track my order with tracking ID 12345”, the entire sentence is the user’s utterance.
Intent: is the user’s intention during a conversation. For example, if a user types “I want to track my order”, the bot should know the user’s intent is to check the current status of the order.
Entity: modifies an intent. For example, if a user types “My tracking ID is 12345”, the entity in this sentence is 12345.
Channel: is a medium for chatbot conversation. Examples of channels include Telegram, Facebook Messenger, WhatsApp, Skype, Slack, SMS, web and so on.
Response: is anything the bot says in response to a user’s utterance.
Natural language processing (NLP): examines an utterance and extracts specific information such as intents and entities. NLP cloud tools include Wit AI, Dialogflow, Luis AI and so on.
Wit.ai: is a cloud service API that makes it easier for developers to integrate Natural language processing into bots, applications, and devices.
Dialogflow: is a service that allows developers to build speech to text and NLP systems with custom functionalities.
Telegram: is a cloud-based instant messaging and voice over IP service.
The code for this project can be found at => https://github.com/learningdollars/adeoluwaakinsanya-telegram-witai-chatbot
Technical Requirements (prerequisites)
Let’s run down through the Prerequisites and tools required to build our system:
- CodeIgniter (PHP)
- Git
- Gcloud
- Ngrok
- Telegram Account
- Wit AI Account (NLP)
- Dialogflow (Small talks)
- Linux OS (feel free to use any OS).
Part 1 – Telegram Chatbot Setup:
A Telegram account is required to create a Telegram chatbot. If you don’t already have a Telegram account, register here. Follow the below steps to create a new chatbot on Telegram.
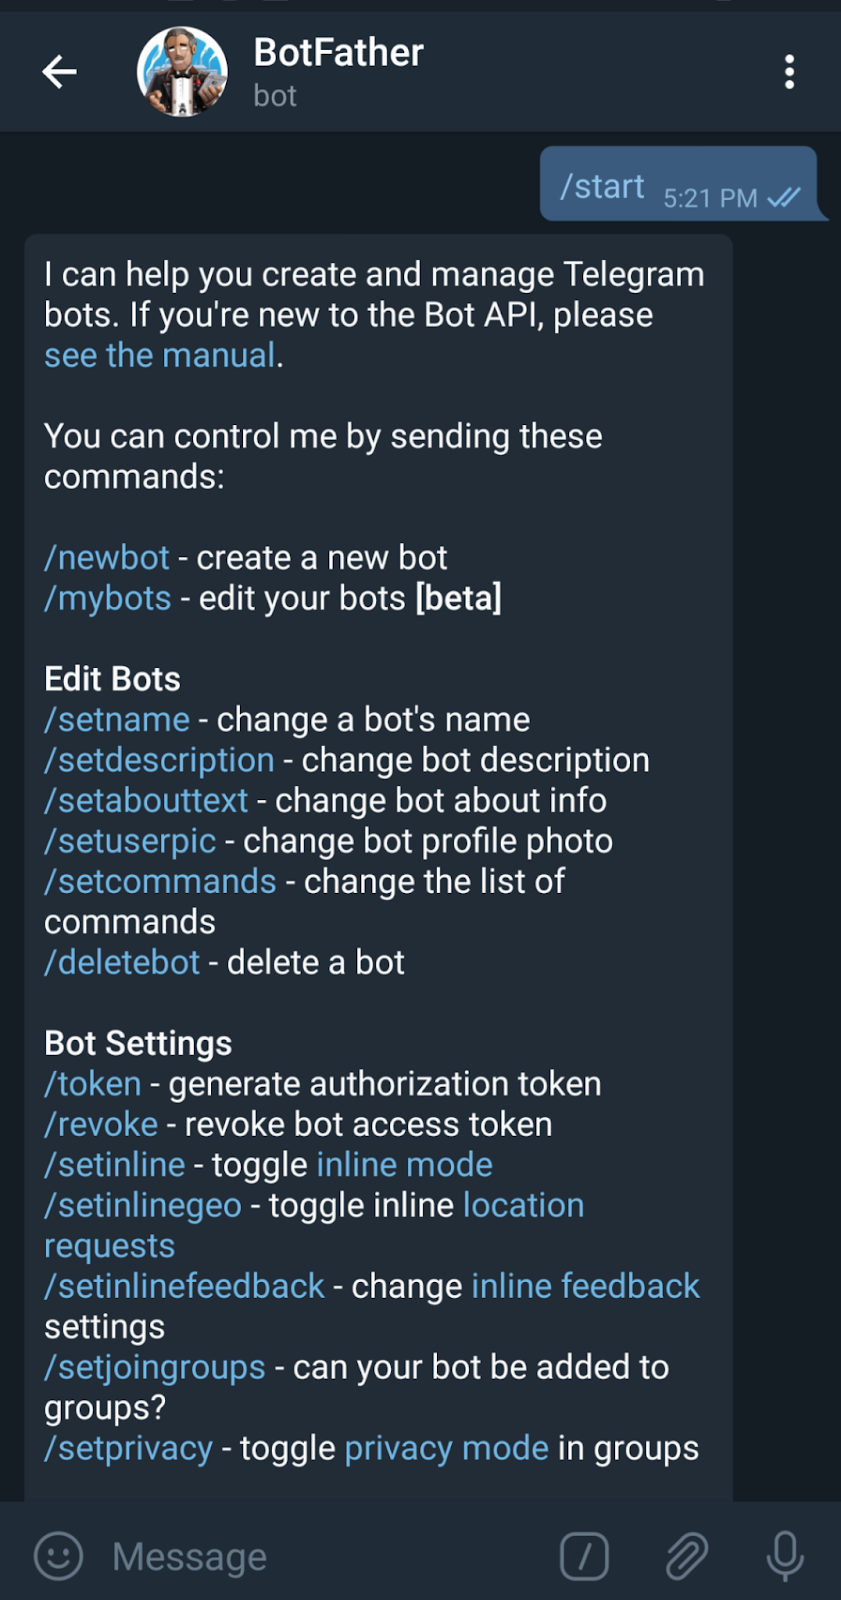
- Launch your Telegram app, search and launch BotFather.

- Tap the START button to view list of options.

- Tap /newbot to create a new chatbot.
- Choose a name and unique username for your bot.
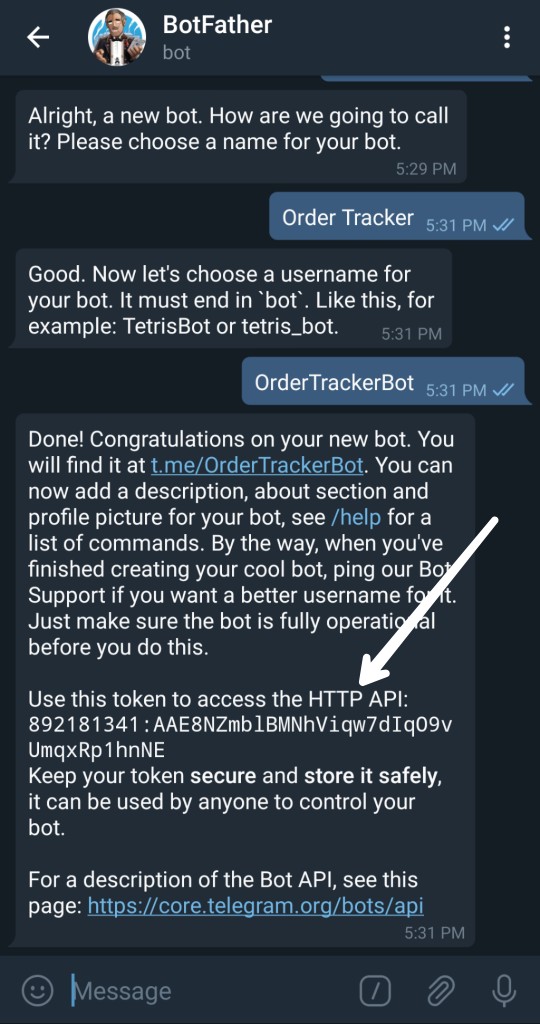
- A token to access the HTTP API would be generated after the successful creation of your bot.
Store the access token in your OS environment variable as it would be used to make HTTP requests and set up the webhook to your application. If you are running a Linux OS, open up your terminal and run:
$ export TELEGRAM_ACCESS_TOKEN=YOUR-TELEGRAM-ACCESS-TOKEN
Note: Replace YOUR-TELEGRAM-ACCESS-TOKEN with the token from your telegram bot.
Part 2 – DialogFlow Setup:
To improve the user experience of our chatbot, we would use the Small Talk feature in Dialogflow to provide responses to casual conversation such as hello, hi, hey etc.
- If you don’t already have a Dialogflow account, create one using your Google account. Read and accept the terms and conditions after successfully creating your account.

- Dialogflow would be shutting down API V1 on October 23rd, 2019. So we would be working with API V2. Learn how to migrate to API V2 Here
- Create a new agent.

- Navigate to small talks on the sidebar, click the switch to enable it and tap the save button. You can customize the responses users get by putting in custom response in each of the fields.

- Navigate to your agent/project settings:
- Fetch your PROJECT ID:

Store your project ID in your OS environment variable. If you are running a Linux OS, open up your terminal and run:
$ export DIALOGFLOW_PROJECT_ID=YOUR-DIALOGFLOW-PROJECT-ID
Note: Replace YOUR-DIALOGFLOW-PROJECT-ID with your Project ID from your Dialogflow account.
Tap the Service Account link beneath your Project ID. You would be redirected to your Google cloud platform dashboard.

Tap the “Create key” button in the actions drop down. A pop up will be displayed asking you what format to export your private key for Dialogflow integrations.

Tap JSON and press the create button. A JSON file would be downloaded to your computer

We would use the downloaded JSON file to generate a token to make requests to our Dialogflow API.
Store the path to the JSON file in your OS environment variable. If you are running a Linux OS, open up your terminal and run:
$ export GOOGLE_APPLICATION_CREDENTIALS="/home/user/Downloads/ordertracker-isocuo-d7882fd63303.json"
Note: Replace path with your JSON credentials path in your terminal.
If you don’t already have Google Cloud SDK installed, navigate to your terminal and run:
$ sudo snap install google-cloud-sdk
Part 3 – Wit AI Setup:
Wit AI would be used to extract the tracking ID from a user’s utterance.
- If you don’t already have a wit.ai account, create one using your Github or Facebook account. Read and accept the terms and conditions after successfully creating your account.

- Fill in the required fields (Username, email address, and a short description of your bot) in the next page

- Entity Configuration
- A default entity named ‘intent’ is created on account creation

- Tap the ‘intent’ in entity and select “Free Text and Keywords” in the lookup strategy. Enter keyword ‘track’ and press enter under the keywords table.

- Let’s validate our entity to be sure the system detects it. Navigate to the Understanding page. Enter “I want to track my order” in the user says input field. The system would automatically detect our entity ‘track’. Tap the validate button to validate the user’s utterance.

- Enter “My Tracking ID is 12345” in the user says input field and highlight “12345”. Enter “tracking_id” as the entity name in the “Add a new entity” input field and press enter twice.

- Tap the newly created entity, tracking_id in the entity table to view the newly added keyword.

- To skip through all these steps, you can always import this project data into your new app.

- Navigate to setting and fetch your Server access tokens.

Store your server access token in your OS environment variable. If you are running a Linux OS, open up your terminal and run:
$ export WITAI_ACCESS_TOKEN=YOUR-WITAI-ACCESS-TOKEN
Note: Replace YOUR-WITAI-ACCESS-TOKEN with your wit.ai server access token from your wit.ai account.
Part 4 – CodeIgniter Project Setup:
Navigate to your project directory in your terminal and install CodeIgniter via GitHub by running:
$ git clone https://github.com/bcit-ci/CodeIgniter.git
After installing CodeIgniter, create a local web server by running;
$ php -S localhost:8000
Our local server should be running and can be accessed via http://localhost:8000.
Part 5 – Ngrok Server Setup:
If you don’t already have Ngrok installed on your computer, open up your terminal and install by running:
$ snap install ngrok
To generate a Ngrok hosted public address for your web application, navigate to your project directory and run;
$ ngrok http 8000
This public address or hostname would be used to configure the webhook URL for your Telegram Chatbot.
Part 6 – Telegram Chatbot Logic:
Telegram sends an HTTP request to your webhook URL configured within your telegram bot when a user sends a message and fetches a response from your application.
For our simple order tracking bot, we would build a system that uses dialogflow to handle casual conversation and wit.ai to recognize tracking numbers from a user’s utterance.
Navigate to application/config/config.php in your CodeIgniter project directory and update $config[‘base_url’] to your Ngrok public address.
Create a new controller, `Flow.php` under application/controllers and a new model, `Send_model.php` under application/model.
Flow.php receives and handles incoming requests from telegram. Send_model handles making HTTP requests to Dialogflow, Wit AI and Telegram.
See example;
`Flow.php`
<?php
defined('BASEPATH') or exit('No direct script access allowed');

class Flow extends CI_Controller
{
    public function __construct()
    {
        parent::__construct();
        $this->load->model('Send_model');
    }

    /**
     * Telegram webhook method.
     */
    public function webhook()
    {
        $input = json_decode(file_get_contents('php://input'), true);
        $userData = array();
        $userData['chat_id'] = $input['message']['chat']['id'];
        $userData['message'] = $input['message']['text'];
        $userData['message_id'] = $input['message']['message_id'] ?? null;
        $userData['first_name'] = $input['message']['from']['first_name'] ?? null;
        $userData['last_name'] = $input['message']['from']['last_name'] ?? null;
        $userData['username'] = $input['message']['from']['username'] ?? null;
        $this->start($userData);
    }

    /**
     * Handles response to users input/utterances
     */
    public function start($userData)
    {
        // $orders stores sample order data such as tracking_id, description and status of the order
        $orders = array(
            array( 'tracking_id'=>'1234', 'description'=>'Iphone 11', 'status'=>'Waiting for pick up'),
            array( 'tracking_id'=>'9797', 'description'=>'Pixel 4', 'status'=>'Shipment dispatched'),
            array( 'tracking_id'=>'4343', 'description'=>'Samsung Note 10', 'status'=>'Shipment accepted by airline'),
            array( 'tracking_id'=>'2892', 'description'=>'Haweii P90', 'status'=>'Delivery Successful'),
        );
        if ($userData['message'] == '/start') {
            // if a user sends '/start', the default message is sent as a response
            $count = 1;
            $tracking_id = "Sample Tracking IDs:\n\n";
            foreach ($orders as $row) {
                $tracking_id .= $count++.". ".$row['tracking_id']."\n";
            }
            $botResponse = "*Hi there*, `".$userData['first_name']."`. I am orderTracker🙂. \n\nI can track the status of your order within seconds. Just send in your tracking id to begin.\n\n\n$tracking_id";
            return $this->Send_model->sendMessage($userData, $botResponse);
        } else {
            $queryWitAI = $this->Send_model->queryWitai($userData);
            $witAiIntent = $queryWitAI['entities']['intent'][0]['value'];
            $witAiTrackingId = $queryWitAI['entities']['tracking_id'][0]['value'];
            if (isset($witAiIntent) && $witAiIntent == 'track') {
                // Check if the message contains entity 'track'
                if (isset($witAiTrackingId) && $witAiTrackingId !== null) {
                    // Check if the message contains a Tracking ID
                    $botResponse = $this->orderSearch($orders, $witAiTrackingId);
                } else {
                    $botResponse = "Please enter your tracking id";
                }
                return $this->Send_model->sendMessage($userData, $botResponse);
            } elseif (is_numeric($witAiTrackingId) && $witAiTrackingId !== null) {
                // Check if the message contains a Tracking ID
                $botResponse = $this->orderSearch($orders, $witAiTrackingId);
                return $this->Send_model->sendMessage($userData, $botResponse);
            } else {
                $queryDialogFlow = $this->Send_model->queryDialogFlow($userData);
                $botResponse = $queryDialogFlow['queryResult']['fulfillmentText'];
                if (isset($botResponse) && $botResponse != null) {
                    // Check if the message contains greetings such as hi, hello, hey
                    return $this->Send_model->sendMessage($userData, $botResponse);
                } else {
                    // if !$botResponse, send the default message
                    $botResponse = "My little witty brain could not comprehend";
                    return $this->Send_model->sendMessage($userData, $botResponse);
                }
            }
        }
    }

    /**
     * Handles finding orders using its Tracking ID
     */
    public function orderSearch($orders, $query)
    {
        $row = array_search($query, array_column($orders, 'tracking_id'));
        if (isset($row) && $row !== false) {
            $trackingId = $orders[$row]['tracking_id'];
            $description = $orders[$row]['description'];
            $status = $orders[$row]['status'];
            return "Tracking ID: $trackingId\n\nOrder Description: $description\n\nOrder Status: $status";
        } else {
            return "Order not found";
        }
    }
}
`Send_model.php`
<?php
class Send_model extends CI_Model
{
    /**
     * Creates an array containing the required body for telegram HTTP request
     */
    public function sendMessage($userData, $botRresponse)
    {
        $this->senderAction($userData, "typing");
        $data = [
                    'chat_id'=>$userData['chat_id'],
                    'text'=> $botRresponse,
                    'parse_mode'=>'MarkDown',
                    'reply_to_message_id'=>null,
                    'reply_markup'=>null
                ];
        $this->telegram(array('type'=>'sendMessage', 'data'=>$data));
    }

    /**
     * Sends the 'bot is typing' message
     */
    public function senderAction($userData, $sender_action)
    {
        $data = [
                'chat_id'=>$userData['chat_id'],
                'action'=>$sender_action
                ];
        return $this->telegram(array('type'=>'sendChatAction','data'=>$data));
    }

    /**
     * Queries the wit.ai api to fetch entities
     */
    public function queryWitai($userData)
    {
        $token = getenv('WITAI_ACCESS_TOKEN');
        $headers = array('Authorization: Bearer '.$token);
        $body = array('q' => $userData['message'], 'v' => '20181116');
        $url = "https://api.wit.ai/message?".http_build_query($body);
        return $this->doCurl($url, $headers, '', '');
    }

     /**
     * Queries the dialogflow api to fetch responses
     */
    public function queryDialogFlow($userData)
    {
        // 'gcloud auth application-default print-access-token' fetches the access token for making HTTP requests
        $token = exec('gcloud auth application-default print-access-token');
        $projectId = getenv('DIALOGFLOW_PROJECT_ID');
        $headers = array("Authorization: Bearer $token", "Content-Type: application/json; charset=utf-8");
        $body = json_encode(array('query_input' => array('text' => array('text'=>$userData['message'], 'language_code'=>'en-US'))));
        $url = "https://dialogflow.googleapis.com/v2/projects/$projectId/agent/sessions/session-id:detectIntent";
        return $this->doCurl($url, $headers, 'dialogflow', $body);
    }

     /**
     * Sends response back to the user
     */
    public function telegram($data)
    {
        $token = getenv('TELEGRAM_ACCESS_TOKEN');
        $headers = array();
        $body = $data['data'];
        $url = "https://api.telegram.org/bot$token/".$data['type']."?".http_build_query($body);
        return $this->doCurl($url, $headers, '', '');
    }

     /**
     * Makes HTTP request
     */
    public function doCurl($url, $headers, $reqType, $body)
    {
        $ch = curl_init();
        curl_setopt($ch, CURLOPT_URL, $url);
        if ($reqType == 'dialogflow') {
            curl_setopt( $ch, CURLOPT_POSTFIELDS, $body );
        }
        else {
            curl_setopt($ch, CURLOPT_POST, false);
        }
        curl_setopt($ch, CURLOPT_HTTPHEADER, $headers);
        curl_setopt($ch, CURLOPT_RETURNTRANSFER, true);
        curl_setopt($ch, CURLOPT_SSL_VERIFYPEER, false);

        $res = curl_exec($ch);
        if (curl_error($ch)) {
            print_r(curl_error($ch));
        }
        curl_close($ch);
        return json_decode($res, true);
    }
}
You’re almost done building your simple order tracking Telegram chatbot.
Part 7 – Setting Telegram Webhook
A Webhook URL needs to be configured for Telegram to send HTTP requests and allow your application respond accordingly during a conversation.
To set the webhook URL, run this in your terminal.
$ curl https://api.telegram.org/bot$TELEGRAM_ACCESS_TOKEN/setWebhook?url=https://YOUR_NGROK_URL/index.php/flow/webhook
Replace YOUR_NGROK_URL with the URL generated when you started your Ngrok Server.
With your chatbot configured, users are now ready to have a conversation with your chatbot on Telegram.
Sample conversation with the Telegram chatbot

Learning tools
More resources on building Telegram chatbots with Dialogflow and Wit AI, can be found on the following sites:
- https://core.telegram.org/bots/api
- https://cloud.google.com/dialogflow/docs/quick
- https://wit.ai/docs
- https://stackoverflow.com/search?q=telegram-bot-php
- https://stackoverflow.com/questions/tagged/dialogflow?tab=Newest
- https://stackoverflow.com/questions/tagged/wit.ai
Learning Strategy
During the course of this project, I got a bit frustrated because of the complexity of Dialogflow’s v2 API. Setting it up involved so many steps which I eventually maneuvered. I had to browse through the Dialogflow v2 API documentation thoroughly to find how to generate access token for making requests to the new endpoints which took most of my time. In case you encounter any issue in the course of trying to set up your project, you should browse through the learning tools above and also check google for tutorials on Dialogflow, Wit AI, Telegram bot and Codeigniter.
Reflective Analysis
I have worked with Dialogflow v1 in the past which was very easy to set up but it’s being depreciated October 23, 2019. Working with Dialogflow v2 seemed to be a very difficult task because of the long process involved and the new integration with Google cloud platform. I learnt how to generate access tokens via the Gcloud SDK for making requests to our agent to fetch responses.
Conclusion & Next Steps
Now that you have set up and configured your Telegram chatbot to respond to users input, you can repeat the same and start building Telegram chatbots for customer service, financial service, campaign broadcast and so on. The next time you need to build a Telegram bot you can skip all of the long setup steps and just:
- Clone the project from GitHub.
- Setup Dialogflow and Wit AI.
- Generate a Ngrok public address that routes to your localhost webserver port.
- Create a Telegram bot via botfather and set up your webhook URL.
- Build your chatbot logic.
Project source code => https://github.com/learningdollars/adeoluwaakinsanya-telegram-witai-chatbot
Citation
Time Report
Estimated project Setup time: 18 hours.
Good article. It’s worthwhile and everyone who is enthusiastic to do something new should try this.
Articles like this would be useful to help us understand how to automate things I was trying something like this for my college project and this reduced my effort.This can be applied in malls to check offers and discounts on specific items, it can also be applied to give automated replies for generic queries.
Image Source: https://packageslife.com/