
Hire the author: Akinsanya A

Telegram log in will allow registered Telegram users to log in to your application without passwords. Telegram provides a customizable log in widget that makes it possible for applications to authenticate users through their Telegram account by sending a confirmation message to a user as seen below:

In this tutorial, we will be integrating a Telegram log in widget into a CodeIgniter web application. The widget asks for a first time user’s phone number and sends a confirmation message via Telegram to authorize the application. A two-click log in is provided subsequently while trying to log in using the widget.
Key terms:
Telegram: is a cloud-based instant messaging and voice over IP service.
Codeigniter: is an open-source PHP web development framework.
Ngrok: exposes a localhost server to the internet.
The code for this project can be found at => https://github.com/learningdollars/adeoluwaakinsanya-codeigniter-telegram-login
Technical Requirements (prerequisites)
Let’s run down through the Prerequisites and tools required to build our system:
- Codeigniter (PHP)
- Git
- Ngrok Installed
- ( $ snap install ngrok )
- Telegram Account
- Linux OS (feel free to use any OS)
Part 1 – CodeIgniter Project Setup:
Navigate to your project directory in your terminal and install CodeIgniter via GitHub by running:
$ git clone https://github.com/bcit-ci/CodeIgniter.git
After installing CodeIgniter, create a local web server by running;
$ php -S localhost:8000
Our local server should be running and can be accessed via http://localhost:8000.
We will be using Ngrok to tunnel our local application to the internet and to generate a Ngrok public URL that will be used to set the domain in our telegram bot.
To generate a Ngrok hosted public address for your web application, open up a new terminal, navigate to your project directory and run;
$ ngrok http 8000
This public address or hostname would be used to configure the domain for our Telegram log in.
Part 2 – Telegram Log in Setup:
You need a telegram account and bot to integrate a log in widget in your web application. If you don’t already have a Telegram account, register here. Create a new Telegram bot via BotFather. Store the access token generated on the successful creation of your bot in your OS environment variable as it would be used to verify authentication response to your web application. If you are running a Linux OS, open up your terminal and run:
$ export TELEGRAM_ACCESS_TOKEN=YOUR-TELEGRAM-ACCESS-TOKEN
Note: Replace YOUR-TELEGRAM-ACCESS-TOKEN with the token from your telegram bot.
For a detailed step by step instructions on creating a new Telegram bot, follow the instructions in part 1 section of this tutorial => https://blog.ldtalentwork.com/2019/10/08/how-to-build-a-chatbot-with-telegram-wit-ai-dialogflow-and-codeigniter/
Follow the instructions below to link the Ngrok domain to our Telegram bot.
- Type and send /setdomain in the message field.

- Select your newly created Telegram bot
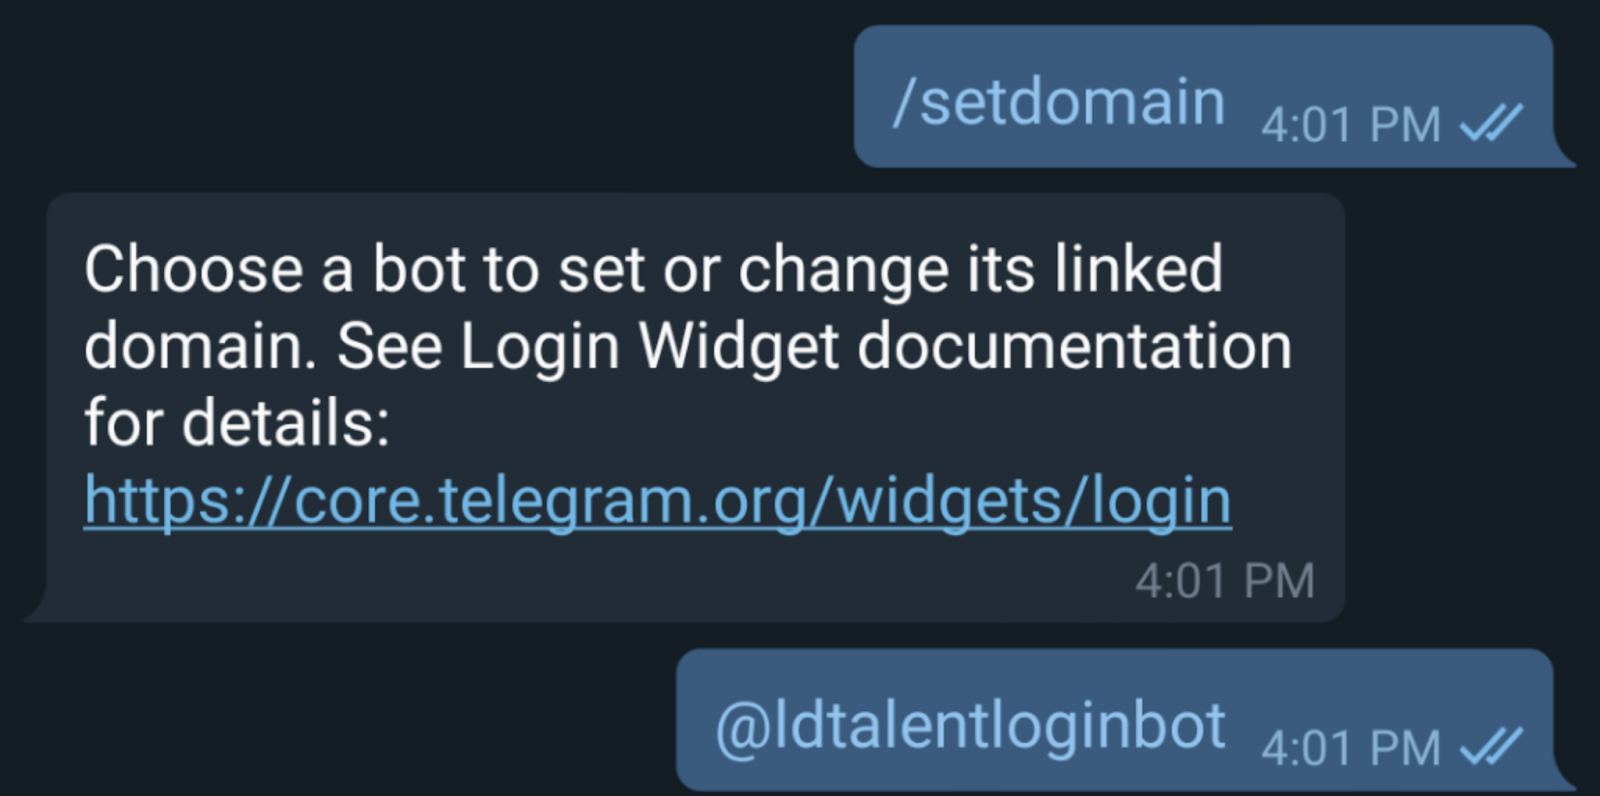
- Input your NGROK_URL

- A success message will be sent after successfully linking the domain to our telegram bot
Part 3 – Configure Telegram Log in Widget:
Telegram provides options to configure the log in widget button.
The following parameters can be appended to the javascript log in widget.
- Bot Username: The “data-telegram-log in” field allows you to input the username of the bot connected to your domain name. (Input the newly-created bot username in this field).
- Button Style: The “data-size” field allows us to select either “small”, ”medium” or “large” as the size of the button. (Input “large” in this field). The logged-in user’s profile picture is shown by default. To remove the profile image, set “data-userpic” to “false”.
- Corner Radius: The corner radius of the button is set by default. To customize it, set the data-radius field to any integer greater than or equal to “0” and less than or equal to “14”. Feel free to customize the widget to your satisfaction.
- Authorization Type: Telegram provides two options to receive authorization after a successful log in.
- Callback Function: The “data-onauth” field allows us to configure a callback function to receive the user’s JSON object containing id, first_name, last_name, username, photo_url, auth_date, and hash.
- Redirect URL: The “data-auth-URL” field allows us to configure a redirect URL to receive the user’s data parameters such as id, first_name, last_name, username, photo_url, auth_date, and hash.
Navigate to application/config/config.php in your CodeIgniter project directory and update $config[‘base_url’] to your Ngrok public address.
Create a new controller, `Auth.php` under application/controllers and add the code below.
See example;
<?php
defined('BASEPATH') or exit('No direct script access allowed');
class Auth extends CI_Controller
{
    public function __construct()
    {
        parent::__construct();
        $this->load->helper('url');
    }
    /**
     * Authentication view
     */
    public function index($param="")
    {
        if ($param == 'callback') {
            $data['page_name'] = 'login_callback';
            $this->load->view('index', $data);
        }
        else if ($param == 'redirect') {
            if ($_GET) {
                $data['user_data'] = $this->verify($_GET);
            }
            $data['page_name'] = 'login_redirect';
            $this->load->view('index', $data);
        }
        else {
            $data['page_name'] = 'login_callback';
            $this->load->view('index', $data);;
        }

    }
    /**
     * verify authentication requests
     */
    public function verify($data)
    {
        $token = getenv('TELEGRAM_TOKEN');
        $check_hash = $data['hash'];
        unset($data['hash']);
        $data_check_arr = [];
        foreach ($data as $key => $value) {
            $data_check_arr[] = $key . '=' . $value;
        }
        sort($data_check_arr);
        $data_check_string = implode("\n", $data_check_arr);
        $secret_key = hash('sha256', $token, true);
        $hash = hash_hmac('sha256', $data_check_string, $secret_key);
        if (strcmp($hash, $check_hash) !== 0) {
            unset($data);
            $data['error'] = "Data is not from Telegram";
            return $data;
        }
        if ((time() - $data['auth_date']) > 86400) {
            unset($data);
            $data['error'] = "Data is Outdated";
            return $data;
        }
        $data['error'] = null;
        return $data;

    }

}
The index($param=””) method accepts either ‘callback’ or ‘redirect’ as parameters to load the respective views. It loads the callback function view by default if no parameter or the wrong parameter is provided.
The verify($data) method is used to verify authentication request from the redirect URL.
Create a new root view, `index.php` under application/views and add the code below
<!DOCTYPE html>
<html lang="en">

<head>
	<meta charset="UTF-8">
	<meta name="viewport" content="width=device-width, initial-scale=1.0">
	<meta http-equiv="X-UA-Compatible" content="ie=edge">
	<title>Telegram Log in</title>
	<style>
		body {
			font-family: helvetica;
			text-align: center;
		}
	</style>
</head>

<body>
	<h1>Telegram Log in</h1>
	<?php include $page_name.'.php';?>
</body>
<script type="text/javascript">
	function onLogin(user) {
		const data = `<p>ID: ${user.id}</p>
					<p>First Name: ${user.first_name}</p>
					<p>Last Name: ${user.last_name}</p>
					<p>Username: ${user.username}</p>
					<p>Photo URL: ${user.photo_url}</p>
					<p>Auth: ${user.auth_date}</p>
					<p>Hash: ${user.hash}</p>`;
		document.getElementById("user").innerHTML = data
	}
</script>

</html>
The ‘index.php’ serves as a template to load other views.
Telegram Callback Function
Create a new view, `login_callback.php` under application/views and add the code below
<p>This example shows you how to implement<br>Telegram login for web using Callback Function.<br><a
href="<?php echo base_url() ?>index.php/auth/index/redirect">Check Out Redirect to URL here</a></p>
<script async src="https://telegram.org/js/telegram-widget.js?7" data-telegram-login="ldtalentloginbot"
data-size="medium" data-radius="1" data-onauth="onLogin(user)" data-request-access="write"></script>
<div id="user">
<!-- Display the user's information on successful authentication -->
</div>
<script type="text/javascript">
	function onLogin(user) {
		const data = `<p>ID: ${user.id}</p>
			<p>First Name: ${user.first_name}</p>
			<p>Last Name: ${user.last_name}</p>
			<p>Username: ${user.username}</p>
			<p>Photo URL: ${user.photo_url}</p>
			<p>Auth: ${user.auth_date}</p>
			<p>Hash: ${user.hash}</p>`;
		document.getElementById("user").innerHTML = data
	}
</script>
Replace ‘ldtalentloginbot’ with your telegram bot’s username.
Navigate to NGROK_URL/index.php/auth/index/callback to test callback function.
Telegram Redirect URL
Create a new view, `login_redirect.php` under application/views and add the code below
<p>This example shows you how to implement<br>Telegram log in for web using Redirect URL.<br><a
href="<?php echo base_url() ?>index.php/auth/index/callback">Check Out Callback Function here</a></p>
<script async src="https://telegram.org/js/telegram-widget.js?7" data-telegram-login="ldtalentloginbot"
data-size="medium" data-radius="1" data-auth-url="<?php echo base_url() ?>index.php/auth/index/redirect"
data-request-access="write"></script>
<div>
<!-- Display the user's information on successful authentication -->
<?php
	$data = isset($user_data['id']) ? "<p>ID: ".$user_data['id']."</p>" : '';
	$data .= isset($user_data['first_name']) ? "<p>First Name: ".$user_data['first_name']."</p>" : '';
	$data .= isset($user_data['last_name']) ? "<p>Last Name: ".$user_data['last_name']."</p>" : '';
	$data .= isset($user_data['username']) ? "<p>Username: ".$user_data['username']."</p>" : '';
	$data .= isset($user_data['photo_url']) ? "<p>Photo URL: ".$user_data['photo_url']."</p>" : '';
	$data .= isset($user_data['auth_date']) ? "<p>Auth Date: ".$user_data['auth_date']."</p>" : '';
	$data .= isset($user_data['hash']) ? "<p>Hash: ".$user_data['hash']."</p>" : '';
	$data .= isset($user_data['error']) ? "<p>Error: ".$user_data['error']."</p>" : '';
	echo $data;
?>

</div>
Replace ‘ldtalentloginbot’ with your telegram bot’s username.
NGROK_URL/index.php/auth/index/redirect to test the redirect URL.
Note: Clone the project from GitHub to access the full source code.
Learning tools
More resources on integrating Telegram log in widget, can be found on the following sites:
- https://core.telegram.org/bots/api
- https://telegram.org/blog/login
- https://core.telegram.org/widgets/login
- https://stackoverflow.com/search?q=telegram-bot-php
Learning Strategy
I couldn’t find any documentation on how to integrate Telegram log in and validate requests with PHP CodeIgniter so I decided to write an article to make it easier for PHP/CodeIgniter developers to integrate Telegram log in to their applications. You can also browse through the learning tools and browse Google for tutorials on Telegram log in and CodeIgniter for more information.
Reflective Analysis
With Telegram log in, we don’t have to spend money on SMS verification services such as Twilio and Africa’s Talking. We can easily save costs by using the Telegram log in widget to authenticate users using only their phone numbers.
Conclusion & Next Steps
Now that we have been able to integrate Telegram log in to a CodeIgniter web application, we don’t need to worry about building a complex authentication system anytime we want to build applications using CodeIgniter. Telegram log in also provides a seamless way to communicate with users after successful log in by requesting access to send users messages. The next time you need to integrate the Telegram log in widget you can skip all of the long setup steps and just:
- Clone the project from GitHub
- Generate a Ngrok public address that routes to your localhost web server port.
- Create a Telegram bot via botfather and link your application domain to the bot.
- Customize your Telegram log in widget
Project source code => https://github.com/learningdollars/adeoluwaakinsanya-codeigniter-telegram-login
Citation
Time Report
Estimated project setup time: 4 hours.
The steps are easy to follow through and this works as expected. Well done.
When I read through this article, It reminded me of the tasks I used to work on in the past that required me to integrate social logins (Facebook, twitter, google) into Flask applications. Learning about how to incorporate Telegram log in into a CodeIgniter web application has given me insights, and right now am wondering if this can be made possible in Flask or Django applications. This implementation is helpful mostly because the users do not always have to remember the passwords they used while creating accounts on your application. Thanks so much for this useful blog.